
Automatic Hand Sanitizer Dispenser Using Arduino
Hold your hand under it and it dispenses, with a short beep. No touching.
Built and tested by Shahan Fathima K · Industrial Robotics Institute
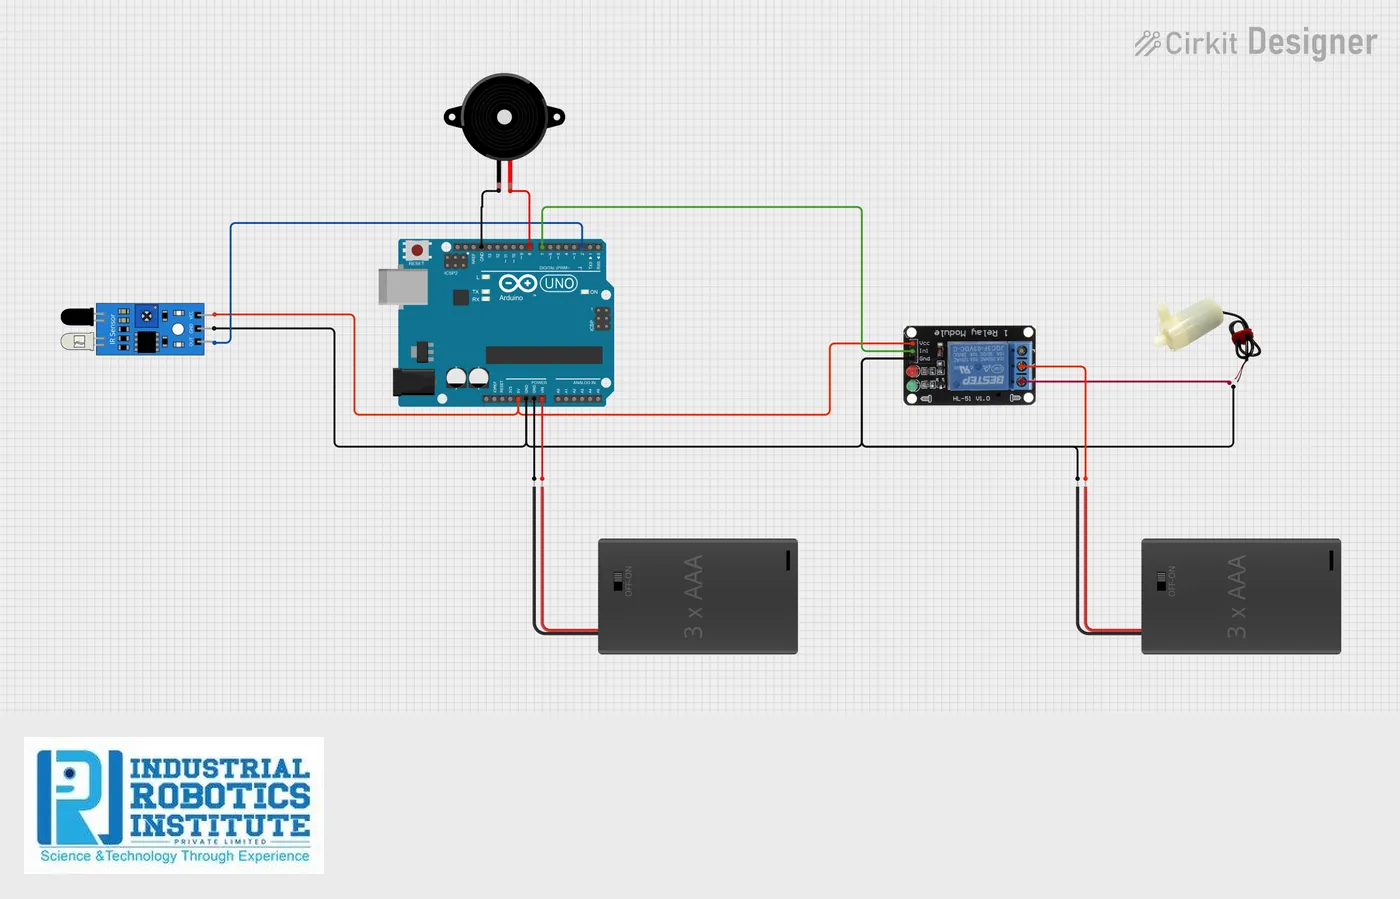
What is the Automatic Hand Sanitizer Dispenser?
A touch-free dispenser. An IR sensor notices when a hand (or cup) is placed under the nozzle, the buzzer gives a short beep, and a relay runs a small 5V pump for 1.5 seconds to dispense the liquid. It then waits 2 seconds so it doesn’t trigger again straight away.
How it works
- The IR sensor output goes LOW when something is under the nozzle.
- The buzzer beeps for 200 ms to confirm.
- The relay turns the pump on for 1.5 seconds to dispense.
- The pump turns off and the system waits 2 seconds before the next use.
Parts list
| Component | Qty |
|---|---|
| Arduino Uno | 1 |
| IR Sensor Module | 1 |
| 5V DC Pump | 1 |
| Relay Module | 1 |
| Buzzer | 1 |
| Lithium-ion Batteries | 2 |
| Battery Case with Switch | 1 |
| Jumper Wires | As needed |
Software
- Arduino IDE
Wiring and connections
| From | Connect to |
|---|---|
| IR sensor VCC | 5V |
| IR sensor GND | GND |
| IR sensor OUT | Pin 2 |
| Relay IN | Pin 7 |
| Relay VCC / GND | 5V / GND |
| Relay COM | Battery + |
| Pump + | Relay NO |
| Pump − | GND |
| Buzzer + | Pin 8 |
| Buzzer − | GND |
| Battery + (via switch) | VIN |
How to build the Automatic Hand Sanitizer Dispenser
- Connect the IR sensor to 5V, GND and pin 2.
- Connect the relay to pin 7, 5V and GND.
- Wire the pump through the relay: battery + to COM, NO to pump +, pump − to GND.
- Connect the buzzer to pin 8 and GND.
- Put the pump in the sanitizer bottle and run its outlet tube to the nozzle.
- Upload the code from the Arduino IDE.
- Hold your hand under the nozzle to test, and adjust the 1500 ms dispense time if needed.
Automatic Hand Sanitizer Dispenser code
Complete, tested Arduino C++ code for this project. Copy it into Arduino IDE and upload it to the Arduino Uno.
int irSensor = 2;
int relay = 7;
int buzzer = 8;

void setup()
{
  pinMode(irSensor, INPUT);
  pinMode(relay, OUTPUT);
  pinMode(buzzer, OUTPUT);
  digitalWrite(relay, LOW);
  digitalWrite(buzzer, LOW);
}

void loop()
{
  int detected = digitalRead(irSensor);

  if (detected == LOW)        // hand detected
  {
    // Buzzer beep for 200 ms
    digitalWrite(buzzer, HIGH);
    delay(200);
    digitalWrite(buzzer, LOW);

    // Turn ON pump
    digitalWrite(relay, HIGH);
    delay(1500);              // dispensing time
    digitalWrite(relay, LOW);

    delay(2000);              // prevent repeat triggers
  }
}
Real-world uses
- Hospitals and clinics
- Schools and offices
- Shops and entrances
- Touch-free water dispensers
Frequently asked questions
What is a Automatic Hand Sanitizer Dispenser?
A touch-free dispenser. An IR sensor notices when a hand (or cup) is placed under the nozzle, the buzzer gives a short beep, and a relay runs a small 5V pump for 1.5 seconds to dispense the liquid.
What components are needed for the Automatic Hand Sanitizer Dispenser?
You need: Arduino Uno (1), IR Sensor Module (1), 5V DC Pump (1), Relay Module (1), Buzzer (1), Lithium-ion Batteries (2), Battery Case with Switch (1), Jumper Wires. Software: Arduino IDE.
Is the Automatic Hand Sanitizer Dispenser project good for beginners?
Yes. It is rated beginner and takes about 1–2 hours to build, using the Arduino Uno. The guide on this page explains every connection and step.
Where can I get the code for the Automatic Hand Sanitizer Dispenser?
The complete, tested Arduino C++ code is free on this page. Copy it into Arduino IDE and upload it to the board.
Can I buy a kit for the Automatic Hand Sanitizer Dispenser?
Yes. IRI sells a kit with the parts for this project (PRJ-034). Message IRI on WhatsApp at +91 86060 82634 for the kit price and delivery details.