
Digital Thermometer Using DHT11 Using Arduino
Reads the room temperature and shows it live on an LCD.
Built and tested by Shahan Fathima K · Industrial Robotics Institute
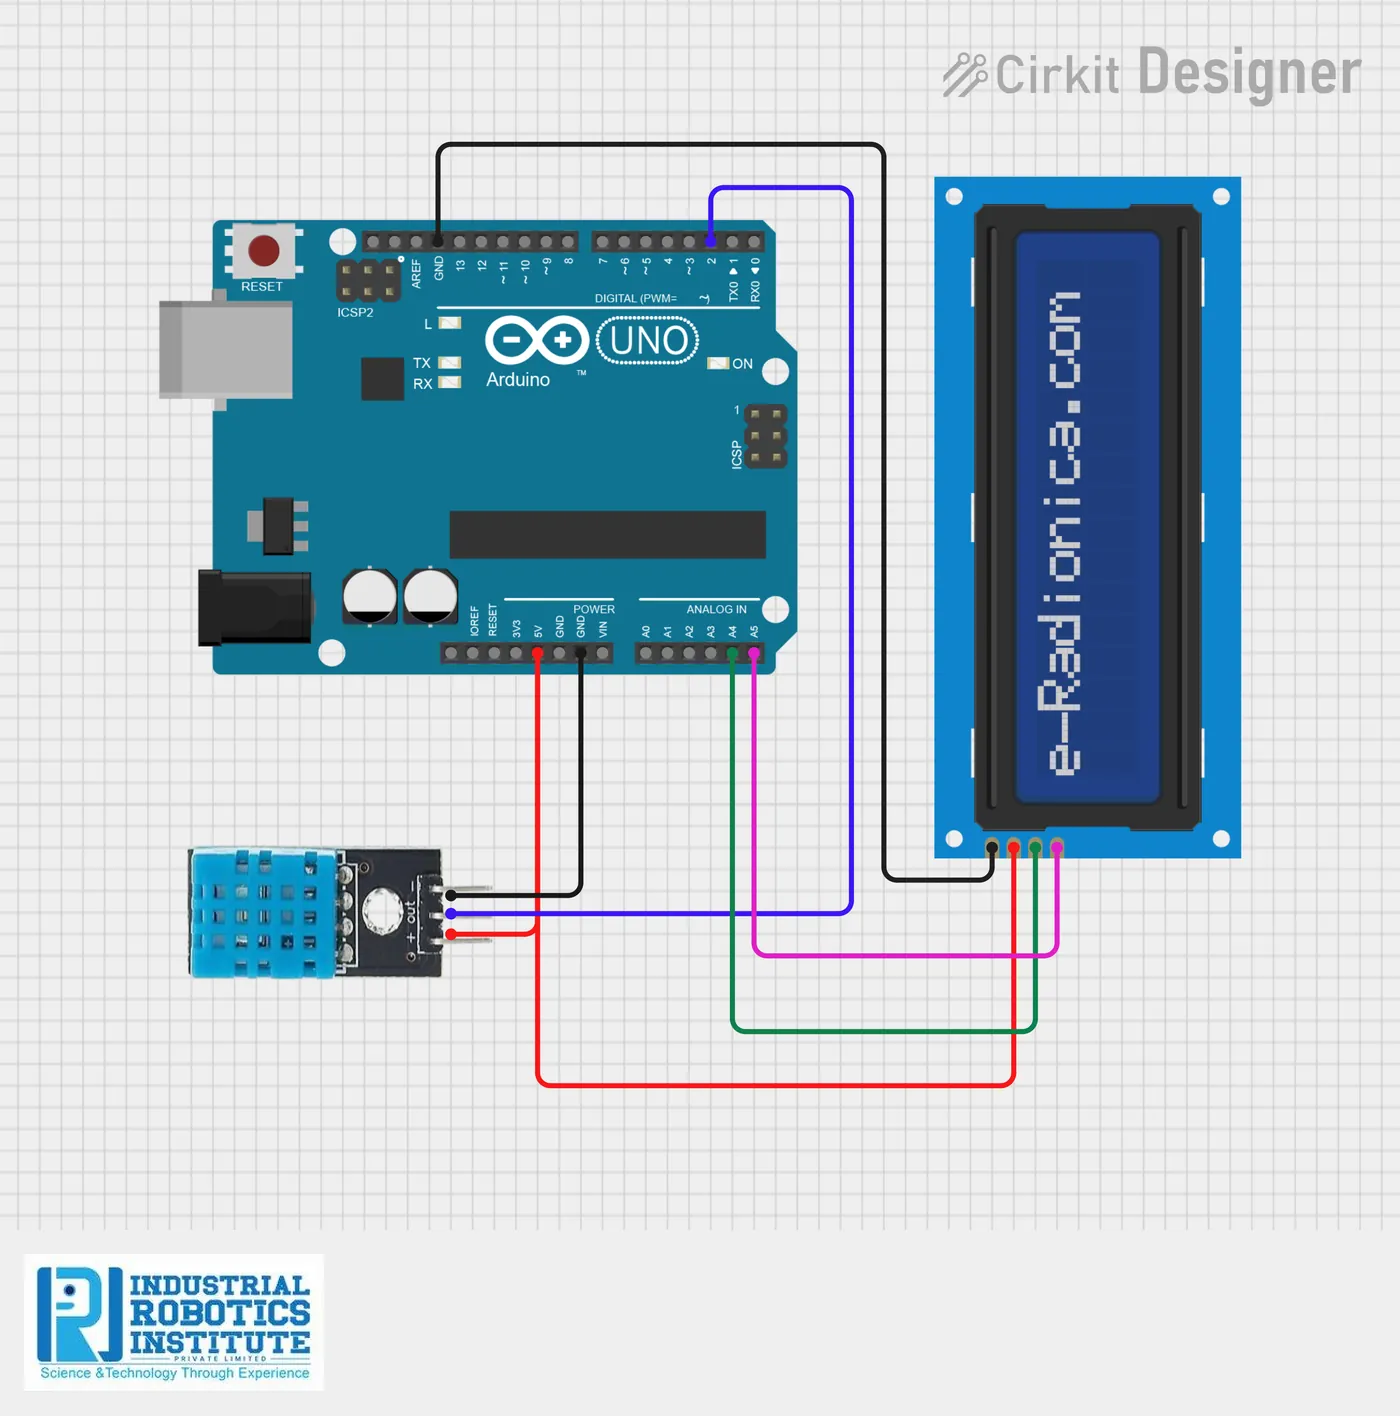
What is the Digital Thermometer Using DHT11?
A simple digital thermometer. A DHT11 sensor measures the surrounding temperature, and the Arduino shows it on a 16×2 I2C LCD, updating every 2 seconds. If the sensor can’t be read, the screen shows "Error".
How it works
- On start-up the LCD shows "Digital Thermo" for 2 seconds.
- The Arduino reads the temperature from the DHT11 sensor.
- It prints the value in °C on the LCD.
- If the reading fails, it shows "Error" instead.
- The reading updates every 2 seconds.
Parts list
| Component | Qty |
|---|---|
| Arduino Uno | 1 |
| DHT11 Temperature & Humidity Sensor | 1 |
| 16×2 LCD with I2C Module | 1 |
| Jumper Wires | As needed |
Software
- Arduino IDE
- DHT sensor library
- LiquidCrystal_I2C library
Wiring and connections
| From | Connect to |
|---|---|
| DHT11 VCC | 5V |
| DHT11 GND | GND |
| DHT11 DATA | Pin 2 |
| LCD VCC | 5V |
| LCD GND | GND |
| LCD SDA | A4 |
| LCD SCL | A5 |
How to build the Digital Thermometer Using DHT11
- Connect the DHT11 to 5V, GND and pin 2.
- Connect the I2C LCD to 5V, GND, A4 (SDA) and A5 (SCL).
- Install the DHT sensor and LiquidCrystal_I2C libraries.
- Upload the code from the Arduino IDE.
- If the LCD is blank, adjust its contrast screw or try address 0x3F instead of 0x27.
Digital Thermometer Using DHT11 code
Complete, tested Arduino C++ code for this project. Copy it into Arduino IDE and upload it to the Arduino Uno.
#include <Wire.h>
#include <LiquidCrystal_I2C.h>
#include <DHT.h>

#define DHTPIN 2
#define DHTTYPE DHT11

DHT dht(DHTPIN, DHTTYPE);
LiquidCrystal_I2C lcd(0x27, 16, 2);

void setup()
{
  lcd.init();          // some library versions use lcd.begin()
  lcd.backlight();
  dht.begin();

  lcd.setCursor(0, 0);
  lcd.print("Digital Thermo");
  delay(2000);
  lcd.clear();
}

void loop()
{
  float temp = dht.readTemperature();

  lcd.setCursor(0, 0);
  lcd.print("Temp: ");

  if (isnan(temp))
  {
    lcd.print("Error");
  }
  else
  {
    lcd.print(temp);
    lcd.print(" C");
  }

  delay(2000);
}
Real-world uses
- Room temperature display
- Science lab measurements
- Weather station base
- Learning sensors and LCDs
Frequently asked questions
What is a Digital Thermometer Using DHT11?
A simple digital thermometer. A DHT11 sensor measures the surrounding temperature, and the Arduino shows it on a 16×2 I2C LCD, updating every 2 seconds.
What components are needed for the Digital Thermometer Using DHT11?
You need: Arduino Uno (1), DHT11 Temperature & Humidity Sensor (1), 16×2 LCD with I2C Module (1), Jumper Wires. Software: Arduino IDE, DHT sensor library, LiquidCrystal_I2C library.
Is the Digital Thermometer Using DHT11 project good for beginners?
Yes. It is rated beginner and takes about 1–2 hours to build, using the Arduino Uno. The guide on this page explains every connection and step.
Where can I get the code for the Digital Thermometer Using DHT11?
The complete, tested Arduino C++ code is free on this page. Copy it into Arduino IDE and upload it to the board.
Can I buy a kit for the Digital Thermometer Using DHT11?
Yes. IRI sells a kit with the parts for this project (PRJ-035). Message IRI on WhatsApp at +91 86060 82634 for the kit price and delivery details.