
Smart Water Tank Indicator & Auto Fill Using Arduino
Measures the water level and switches the pump on and off by itself.
Built and tested by Aboobacker sidheeq K P · Industrial Robotics Institute
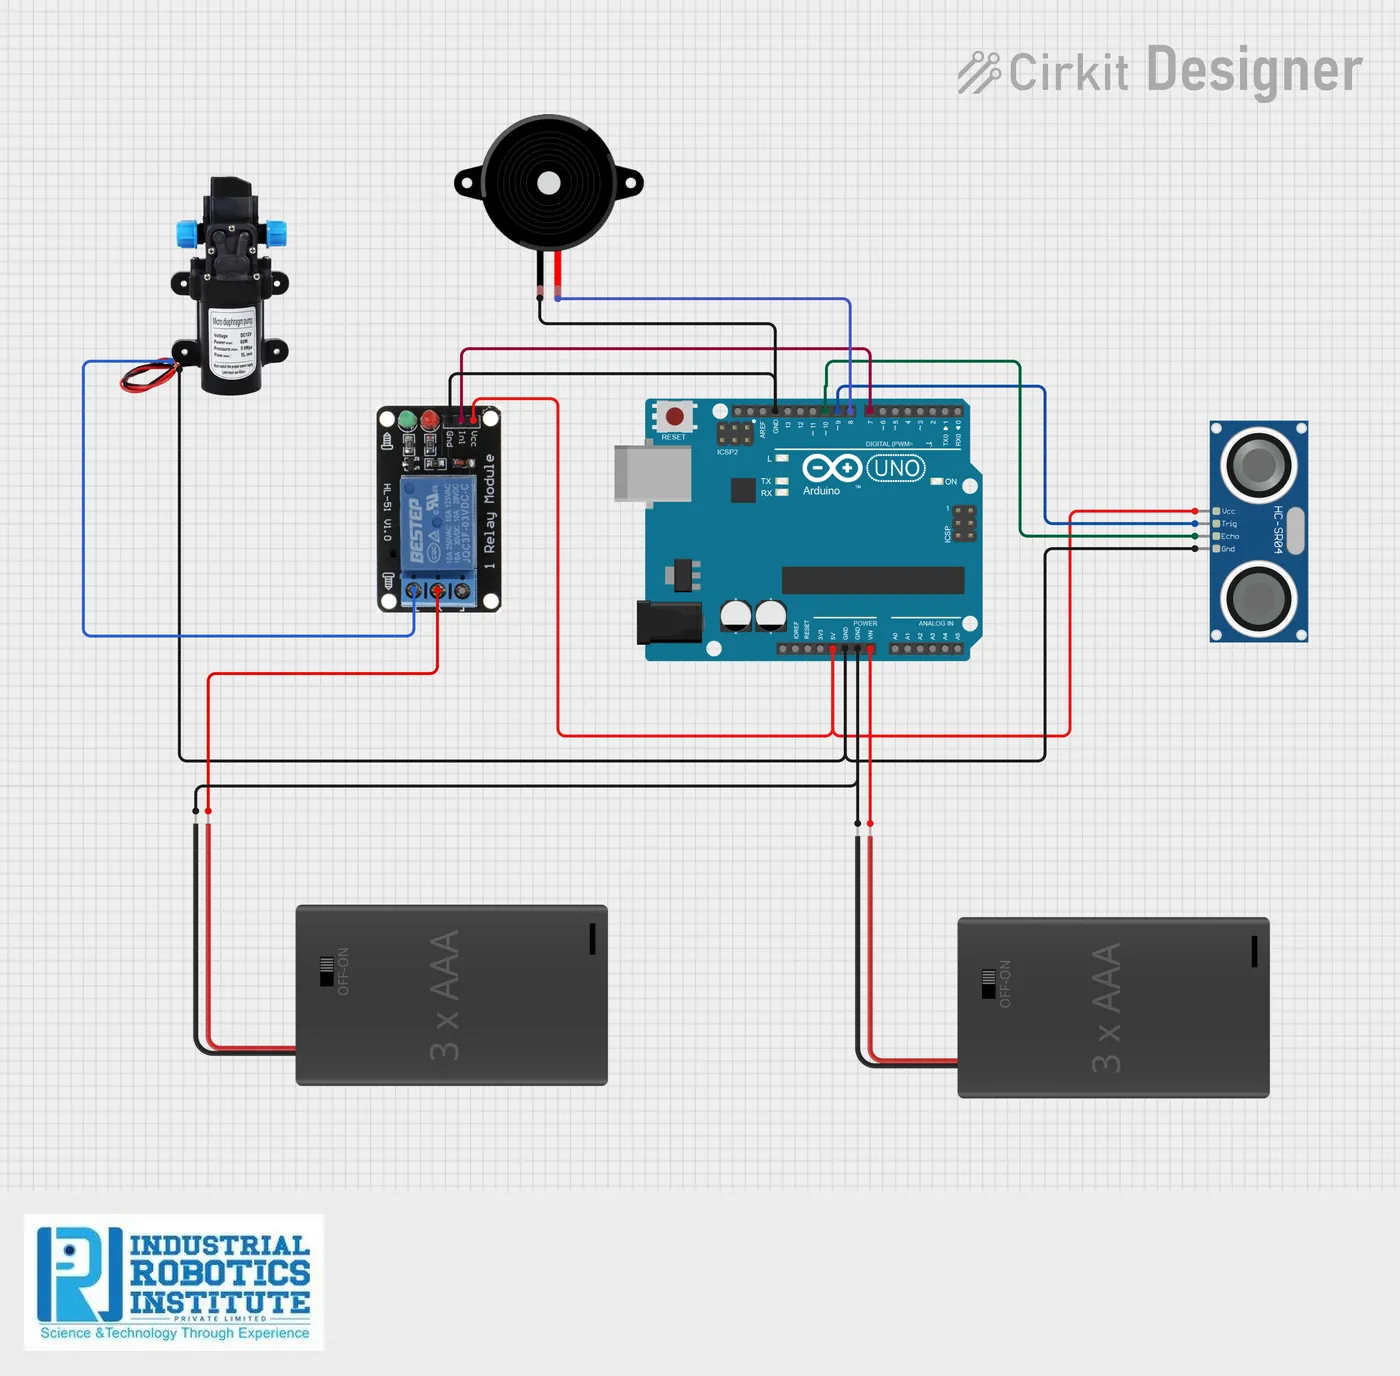
What is the Smart Water Tank Indicator & Auto Fill?
An automatic water tank controller. An ultrasonic sensor measures how far the water surface is from the top of the tank. When the tank is nearly empty the buzzer gives a short alert and a relay turns the pump on; when it is full the pump switches off automatically. No more overflowing or dry tanks.
How it works
- The HC-SR04 ultrasonic sensor sends a pulse down to the water surface.
- The Arduino times the echo and converts it to a distance in centimetres.
- If the distance is more than 20 cm (tank empty), the buzzer beeps for 200 ms and the relay turns the pump on.
- As the water rises, the distance gets shorter.
- When the distance drops below 5 cm (tank full), the relay turns the pump off.
- The check repeats every second.
Parts list
| Component | Qty |
|---|---|
| Arduino Uno | 1 |
| Ultrasonic Sensor (HC-SR04) | 1 |
| Relay Module | 1 |
| Water Pump (AC/DC) | 1 |
| Buzzer | 1 |
| Lithium-ion Batteries | 2 |
| Battery Case with Switch | 1 |
| Jumper Wires | As needed |
Software
- Arduino IDE
Wiring and connections
| From | Connect to |
|---|---|
| Ultrasonic VCC | 5V |
| Ultrasonic GND | GND |
| Ultrasonic TRIG | Pin 9 |
| Ultrasonic ECHO | Pin 10 |
| Relay IN | Pin 7 |
| Relay VCC / GND | 5V / GND |
| Relay COM | Pump power supply + |
| Pump + | Relay NO |
| Pump − | GND |
| Buzzer + | Pin 8 |
| Buzzer − | GND |
| Battery + (via switch) | Arduino VIN |
| Battery − | GND |
How to build the Smart Water Tank Indicator & Auto Fill
- Fix the ultrasonic sensor at the top of the tank, facing down at the water.
- Connect the sensor to 5V, GND, pin 9 (TRIG) and pin 10 (ECHO).
- Connect the relay module to pin 7, and wire the pump through the relay’s COM and NO terminals.
- Connect the buzzer to pin 8 and GND.
- Power the Arduino from the battery pack through the switch into VIN.
- Adjust emptyLevel and fullLevel in the code to suit your tank’s height.
- Upload the code from the Arduino IDE.
- Switch on and test by lowering and raising the water level.
Smart Water Tank Indicator & Auto Fill code
Complete, tested Arduino C++ code for this project. Copy it into Arduino IDE and upload it to the Arduino Uno.
#define trigPin 9
#define echoPin 10
#define relay 7
#define buzzer 8

long duration;
int distance;

int emptyLevel = 20; // cm (tank empty threshold)
int fullLevel = 5;   // cm (tank full threshold)

void setup()
{
  pinMode(trigPin, OUTPUT);
  pinMode(echoPin, INPUT);
  pinMode(relay, OUTPUT);
  pinMode(buzzer, OUTPUT);
  digitalWrite(relay, LOW);
}

void loop()
{
  // Trigger ultrasonic
  digitalWrite(trigPin, LOW);
  delayMicroseconds(2);
  digitalWrite(trigPin, HIGH);
  delayMicroseconds(10);
  digitalWrite(trigPin, LOW);

  duration = pulseIn(echoPin, HIGH);
  distance = duration * 0.034 / 2;

  // Tank empty condition
  if (distance > emptyLevel)
  {
    digitalWrite(buzzer, HIGH);  // Buzzer 200 ms
    delay(200);
    digitalWrite(buzzer, LOW);
    digitalWrite(relay, HIGH);   // Pump ON
  }
  // Tank full condition
  else if (distance < fullLevel)
  {
    digitalWrite(relay, LOW);    // Pump OFF
  }

  delay(1000);
}
Real-world uses
- Home overhead tanks
- Apartments and hostels
- Farm water storage
- Schools and offices
Frequently asked questions
What is a Smart Water Tank Indicator & Auto Fill?
An automatic water tank controller. An ultrasonic sensor measures how far the water surface is from the top of the tank.
What components are needed for the Smart Water Tank Indicator & Auto Fill?
You need: Arduino Uno (1), Ultrasonic Sensor (HC-SR04) (1), Relay Module (1), Water Pump (AC/DC) (1), Buzzer (1), Lithium-ion Batteries (2), Battery Case with Switch (1), Jumper Wires. Software: Arduino IDE.
Is the Smart Water Tank Indicator & Auto Fill project good for beginners?
Yes. It is rated beginner and takes about 2–3 hours to build, using the Arduino Uno. The guide on this page explains every connection and step.
Where can I get the code for the Smart Water Tank Indicator & Auto Fill?
The complete, tested Arduino C++ code is free on this page. Copy it into Arduino IDE and upload it to the board.
Can I buy a kit for the Smart Water Tank Indicator & Auto Fill?
Yes. IRI sells a kit with the parts for this project (PRJ-037). Message IRI on WhatsApp at +91 86060 82634 for the kit price and delivery details.