
IoT Smart School Bus Safety System Using ESP32
Tracks the bus live, logs children getting on and off, and sends emergency alerts.
Built and tested by Drisya K S · Industrial Robotics Institute
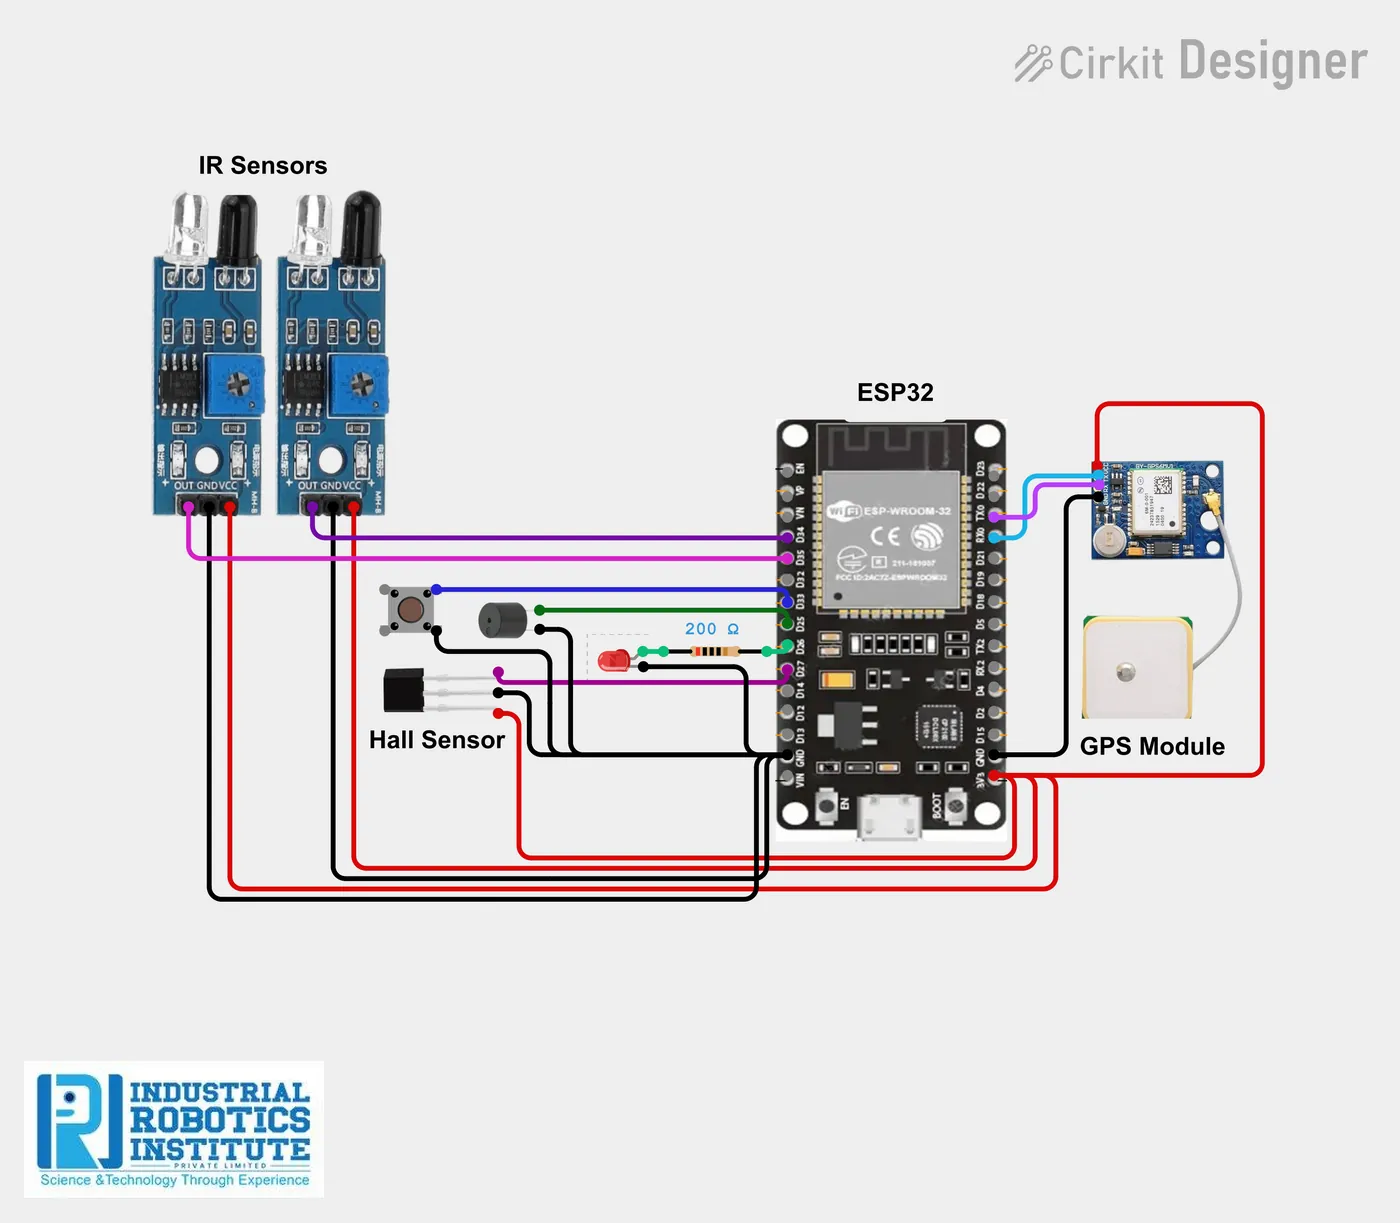
What is the IoT Smart School Bus Safety System?
A safety system for school buses. A GPS module tracks the bus on a map, IR sensors at the door log children entering and leaving, a speed sensor flags over-speeding and a panic button sends an emergency alert. The ESP32 sends everything to the Blynk app so parents and the school can see it in real time.
How it works
- The GPS module provides the bus location; the ESP32 sends it to Blynk V1/V2 for the map.
- IR sensors at the entry and exit report "Child Entered Bus" or "Child Exited Bus" on V3.
- The speed sensor signal triggers an "Over Speed Alert!" and the buzzer.
- Pressing the emergency button sounds the buzzer, lights the LED and sends "Emergency Alert Activated!" on V4.
Parts list
| Component | Qty |
|---|---|
| ESP32 Dev Board | 1 |
| GPS Module (NEO-6M) | 1 |
| IR Sensors x2 (entry / exit) | 1 |
| Speed Sensor (Hall effect) | 1 |
| Push Button (emergency) | 1 |
| Buzzer | 1 |
| LED | 1 |
| Resistor 220Ω | 1 |
| Power Supply (vehicle battery via regulator or USB) | 1 |
Software
- Arduino IDE
- Blynk IoT app
- TinyGPSPlus library
Wiring and connections
| From | Connect to |
|---|---|
| GPS VCC | 3.3V |
| GPS GND | GND |
| GPS TX | GPIO 16 |
| GPS RX | GPIO 17 |
| Entry IR OUT | GPIO 34 |
| Exit IR OUT | GPIO 35 |
| Hall sensor OUT | GPIO 27 |
| Emergency button | GPIO 33 and GND |
| Buzzer + | GPIO 25 |
| LED + (via 220Ω) | GPIO 26 |
How to build the IoT Smart School Bus Safety System
- Connect the GPS to GPIO 16/17, the IR sensors to GPIO 34/35 and the Hall sensor to GPIO 27.
- Connect the emergency button between GPIO 33 and GND, the buzzer to GPIO 25 and the LED to GPIO 26.
- In Blynk, create datastreams V1 latitude, V2 longitude, V3 child status and V4 alerts; add a Map widget for V1/V2.
- Install TinyGPSPlus, add your Blynk details and Wi-Fi (or a mobile hotspot) and upload.
- Mount the IR sensors either side of the bus door and the GPS antenna with a clear sky view.
IoT Smart School Bus Safety System code
Complete, tested Arduino C++ code for this project. Copy it into Arduino IDE and upload it to the ESP32.
#define BLYNK_TEMPLATE_ID "YourTemplateID"
#define BLYNK_TEMPLATE_NAME "School Bus Safety"
#define BLYNK_AUTH_TOKEN "YourAuthToken"

#include <WiFi.h>
#include <BlynkSimpleEsp32.h>
#include <TinyGPS++.h>
#include <HardwareSerial.h>

char ssid[] = "YourWiFiName";
char pass[] = "YourWiFiPassword";

TinyGPSPlus gps;
HardwareSerial gpsSerial(1);

int entrySensor = 34;
int exitSensor = 35;
int speedSensor = 27;
int buzzer = 25;
int led = 26;
int emergencyBtn = 33;

void setup() {
  Serial.begin(115200);
  pinMode(entrySensor, INPUT);
  pinMode(exitSensor, INPUT);
  pinMode(speedSensor, INPUT);
  pinMode(buzzer, OUTPUT);
  pinMode(led, OUTPUT);
  pinMode(emergencyBtn, INPUT_PULLUP);

  gpsSerial.begin(9600, SERIAL_8N1, 16, 17);
  Blynk.begin(BLYNK_AUTH_TOKEN, ssid, pass);
}

void loop() {
  // GPS
  while (gpsSerial.available()) gps.encode(gpsSerial.read());
  Blynk.virtualWrite(V1, gps.location.lat());
  Blynk.virtualWrite(V2, gps.location.lng());

  // Child entry / exit
  if (digitalRead(entrySensor) == HIGH) Blynk.virtualWrite(V3, "Child Entered Bus");
  if (digitalRead(exitSensor) == HIGH)  Blynk.virtualWrite(V3, "Child Exited Bus");

  bool alarm = false;

  // Speed monitoring
  if (digitalRead(speedSensor) == HIGH) {
    alarm = true;
    Blynk.virtualWrite(V4, "Over Speed Alert!");
  }

  // Emergency button
  if (digitalRead(emergencyBtn) == LOW) {
    alarm = true;
    digitalWrite(led, HIGH);
    Blynk.virtualWrite(V4, "Emergency Alert Activated!");
  } else {
    digitalWrite(led, LOW);
  }

  digitalWrite(buzzer, alarm ? HIGH : LOW);

  Blynk.run();
  delay(1000);
}
Real-world uses
- School and college buses
- Staff transport
- Fleet safety
- Learning GPS tracking
Frequently asked questions
What is a IoT Smart School Bus Safety System?
A safety system for school buses. A GPS module tracks the bus on a map, IR sensors at the door log children entering and leaving, a speed sensor flags over-speeding and a panic button sends an emergency alert.
What components are needed for the IoT Smart School Bus Safety System?
You need: ESP32 Dev Board (1), GPS Module (NEO-6M) (1), IR Sensors x2 (entry / exit) (1), Speed Sensor (Hall effect) (1), Push Button (emergency) (1), Buzzer (1), LED (1), Resistor 220Ω (1), Power Supply (vehicle battery via regulator or USB) (1). Software: Arduino IDE, Blynk IoT app, TinyGPSPlus library.
Is the IoT Smart School Bus Safety System project good for beginners?
It is rated advanced and takes about 4–5 hours to build, using the ESP32. The guide on this page explains every connection and step.
Where can I get the code for the IoT Smart School Bus Safety System?
The complete, tested Arduino C++ code is free on this page. Copy it into Arduino IDE and upload it to the board.
Can I buy a kit for the IoT Smart School Bus Safety System?
Yes. IRI sells a kit with the parts for this project (PRJ-154). Message IRI on WhatsApp at +91 86060 82634 for the kit price and delivery details.