
Flood Detection & Alert System Using ESP8266
Monitors water level and sends real-time flood alerts to the Blynk app.
Built and tested by Drisya K S · Industrial Robotics Institute
What is the Flood Detection & Alert System?
A Flood Detection & Alert System monitors rising water levels and gives early warnings to prevent damage and danger. An ESP8266 reads a water level sensor and sends alerts to the Blynk IoT mobile app or cloud dashboard in real time. It is useful in flood-prone areas, basements, water tanks and drainage systems.
How it works
- The water level sensor detects the presence of water.
- The ESP8266 reads the sensor’s digital output.
- When water rises beyond the threshold, the buzzer and LED turn on as a local warning.
- A ‘Flood Alert!’ message is sent to Blynk virtual pin V1; otherwise ‘Safe’ is sent.
- Blynk.run() keeps the cloud connection alive for real-time monitoring.
Parts list
| Component | Qty |
|---|---|
| ESP8266 (Wi-Fi Microcontroller) | 1 |
| Water Level Sensor | 1 |
| Buzzer | 1 |
| LED | 1 |
| Resistor 220Ω (for LED) | 1 |
| Jumper Wires / Breadboard | As needed |
| Power Supply | 1 |
Software
- Arduino IDE
- Blynk IoT
- ESP8266WiFi library
- BlynkSimpleEsp8266 library
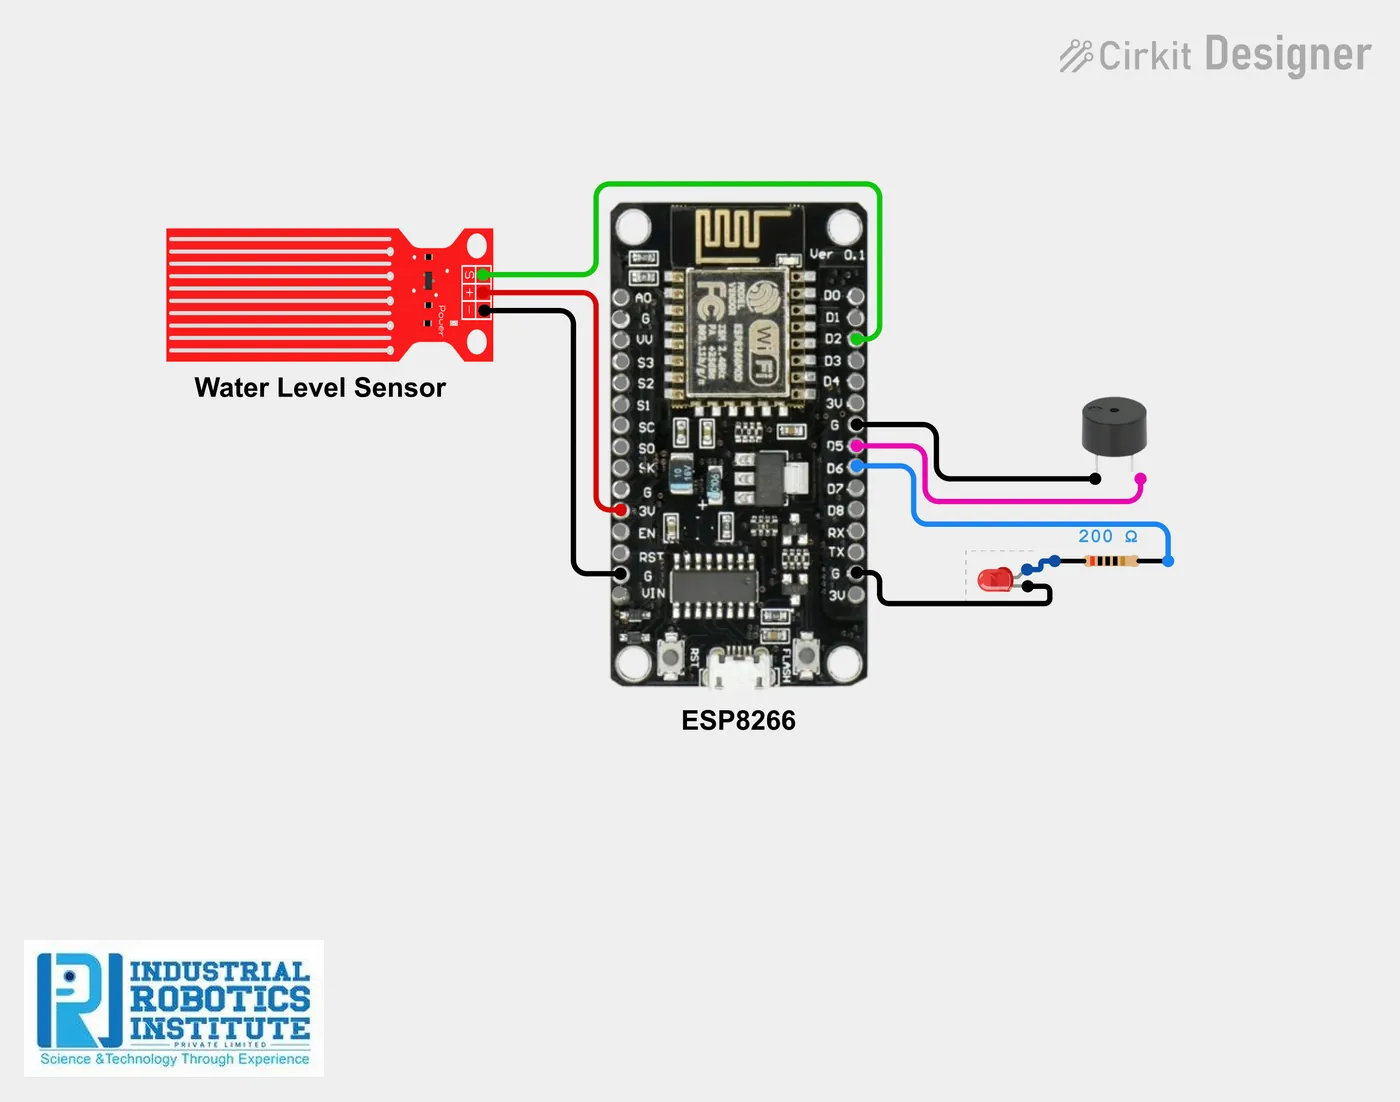
Wiring and connections
| From | Connect to |
|---|---|
| Water Sensor VCC | 3.3V |
| Water Sensor GND | GND |
| Water Sensor OUT | D2 |
| Buzzer + | D5 |
| Buzzer – | GND |
| LED + (via 220Ω) | D6 |
| LED – | GND |
| ESP8266 power | USB or external 5V |
How to build the Flood Detection & Alert System
- Wire the water level sensor to 3.3V, GND and D2 on the ESP8266.
- Connect the buzzer positive to D5 and the LED (through a 220Ω resistor) to D6, both negatives to GND.
- In the Blynk IoT app, create a template with Hardware ESP8266 and Connection Wi-Fi.
- Add a String datastream on virtual pin V1.
- Create a device from the template and copy its Auth Token.
- Add a Label or Notification widget linked to V1.
- Enter your Template ID, Auth Token and Wi-Fi credentials in the code and upload it with the Arduino IDE.
- Power the ESP8266 and watch the Blynk dashboard for real-time flood alerts.
Flood Detection & Alert System code
Complete, tested Arduino C++ code for this project. Copy it into Arduino IDE and upload it to the ESP8266 NodeMCU.
#define BLYNK_TEMPLATE_ID "YourTemplateID"
#define BLYNK_DEVICE_NAME "Flood Detector"
#define BLYNK_AUTH_TOKEN "YourAuthToken"

#include <ESP8266WiFi.h>
#include <BlynkSimpleEsp8266.h>

char ssid[] = "YourWiFiName";
char pass[] = "YourWiFiPassword";

int waterSensor = D2;
int buzzer = D5;
int led = D6;

void setup() {
  Serial.begin(9600);

  pinMode(waterSensor, INPUT);
  pinMode(buzzer, OUTPUT);
  pinMode(led, OUTPUT);

  Blynk.begin(BLYNK_AUTH_TOKEN, ssid, pass);
}

void loop() {
  int waterState = digitalRead(waterSensor);

  if (waterState == HIGH) {
    digitalWrite(buzzer, HIGH);
    digitalWrite(led, HIGH);
    Blynk.virtualWrite(V1, "Flood Alert!");
  }
  else {
    digitalWrite(buzzer, LOW);
    digitalWrite(led, LOW);
    Blynk.virtualWrite(V1, "Safe");
  }

  Blynk.run();
}
Real-world uses
- Flood-prone areas
- Basements
- Water tanks
- Drainage systems
Frequently asked questions
What is a Flood Detection & Alert System?
A Flood Detection & Alert System monitors rising water levels and gives early warnings to prevent damage and danger. An ESP8266 reads a water level sensor and sends alerts to the Blynk IoT mobile app or cloud dashboard in real time.
What components are needed for the Flood Detection & Alert System?
You need: ESP8266 (Wi-Fi Microcontroller) (1), Water Level Sensor (1), Buzzer (1), LED (1), Resistor 220Ω (for LED) (1), Jumper Wires / Breadboard, Power Supply (1). Software: Arduino IDE, Blynk IoT, ESP8266WiFi library, BlynkSimpleEsp8266 library.
Is the Flood Detection & Alert System project good for beginners?
Yes. It is rated beginner and takes about 2–3 hours to build, using the ESP8266 NodeMCU. The guide on this page explains every connection and step.
Where can I get the code for the Flood Detection & Alert System?
The complete, tested Arduino C++ code is free on this page. Copy it into Arduino IDE and upload it to the board.
Can I buy a kit for the Flood Detection & Alert System?
Yes. IRI sells a kit with the parts for this project (PRJ-135). Message IRI on WhatsApp at +91 86060 82634 for the kit price and delivery details.