
IoT Water Quality Monitoring System Using ESP32
Checks pH and cloudiness of water and tells your phone if it is safe.
Built and tested by Drisya K S · Industrial Robotics Institute
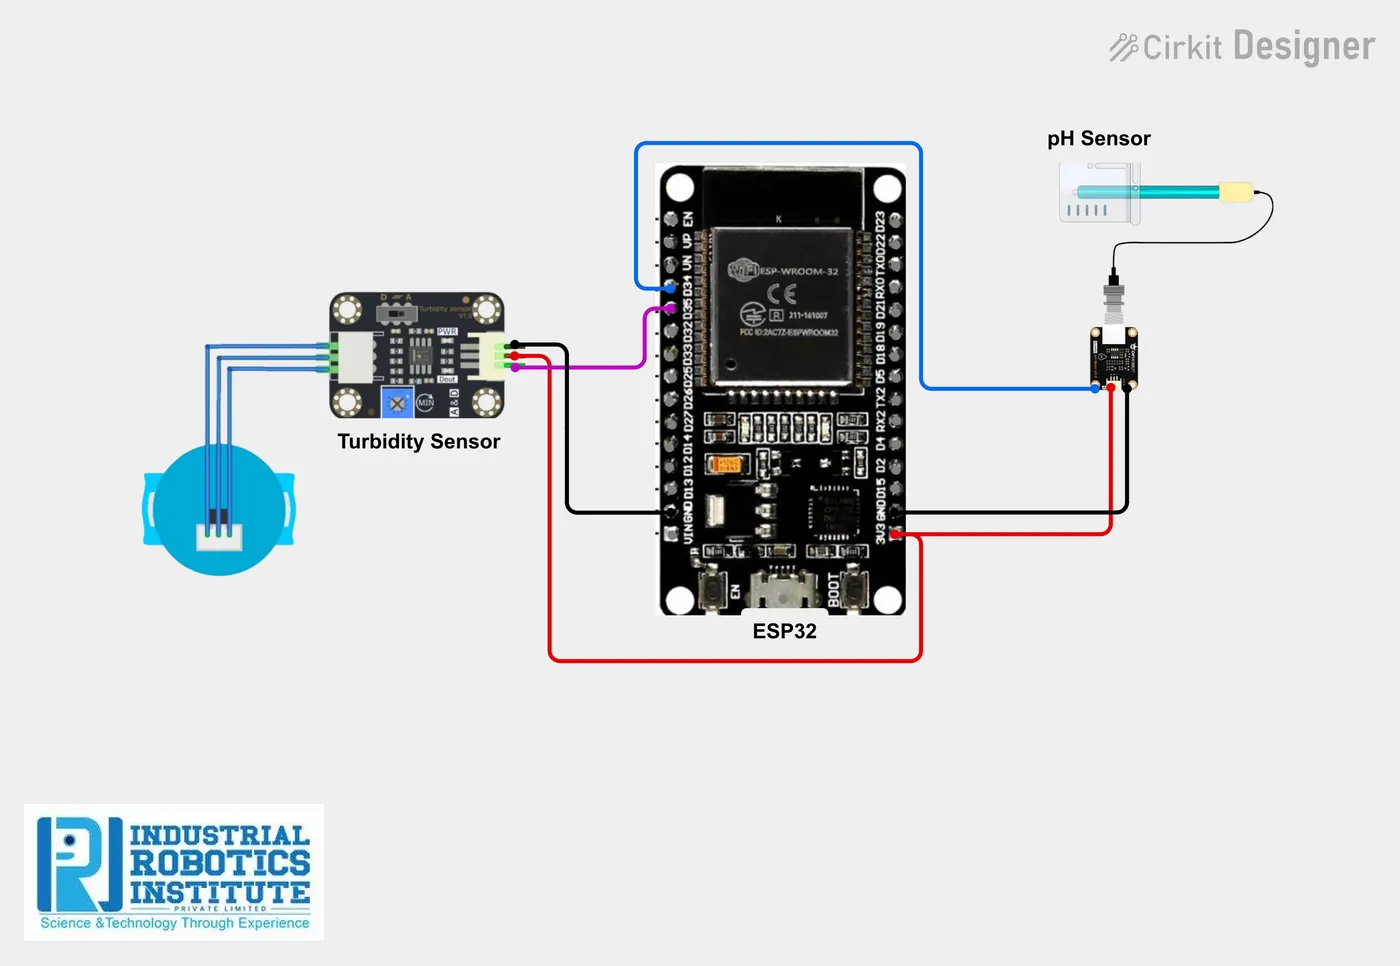
What is the IoT Water Quality Monitoring System?
A real-time water quality monitor. A pH sensor measures how acidic or alkaline the water is, and a turbidity sensor measures how cloudy it is. The ESP32 decides "Safe Water" or "Unsafe Water" and sends the readings and status to the Blynk app.
How it works
- The pH and turbidity sensors give analog readings to the ESP32.
- The pH reading is converted to the 0–14 scale.
- Water is "Safe" if pH is between 6.5 and 8.5 and turbidity is below 2000; otherwise "Unsafe".
- pH, turbidity and status are sent to Blynk V1, V2 and V3 every second.
Parts list
| Component | Qty |
|---|---|
| ESP32 Dev Board | 1 |
| pH Sensor Module | 1 |
| Turbidity Sensor | 1 |
| Jumper Wires / Breadboard | As needed |
| Power Supply | 1 |
Software
- Arduino IDE
- Blynk IoT app
Wiring and connections
| From | Connect to |
|---|---|
| pH sensor VCC | 3.3V |
| pH sensor GND | GND |
| pH sensor AO | GPIO 34 |
| Turbidity VCC | 3.3V |
| Turbidity GND | GND |
| Turbidity AO | GPIO 35 |
| ESP32 | USB or 5V supply |
How to build the IoT Water Quality Monitoring System
- Connect the pH sensor output to GPIO 34 and the turbidity sensor to GPIO 35.
- In Blynk, create a template (ESP32, Wi-Fi) with datastreams V1 (double, pH), V2 (integer, turbidity) and V3 (string, status).
- Add gauges for V1 and V2 and a label for V3; create a device and copy its Auth Token.
- Add your Blynk details and Wi-Fi to the code and upload it.
- Calibrate the pH probe with buffer solutions (pH 4 and 7) for accurate readings.
- Dip both probes in the water and watch the app.
IoT Water Quality Monitoring System code
Complete, tested Arduino C++ code for this project. Copy it into Arduino IDE and upload it to the ESP32.
#define BLYNK_TEMPLATE_ID "YourTemplateID"
#define BLYNK_TEMPLATE_NAME "Water Quality"
#define BLYNK_AUTH_TOKEN "YourAuthToken"

#include <WiFi.h>
#include <BlynkSimpleEsp32.h>

char ssid[] = "YourWiFiName";
char pass[] = "YourWiFiPassword";

int phPin = 34;
int turbidityPin = 35;

void setup() {
  Serial.begin(115200);
  pinMode(phPin, INPUT);
  pinMode(turbidityPin, INPUT);
  Blynk.begin(BLYNK_AUTH_TOKEN, ssid, pass);
}

void loop() {
  int phValue = analogRead(phPin);
  int turbidityValue = analogRead(turbidityPin);

  float ph = (phValue / 4095.0) * 14;   // simple 0-14 scale; calibrate for accuracy
  float turbidity = turbidityValue;

  String quality;
  if (ph >= 6.5 && ph <= 8.5 && turbidity < 2000) {
    quality = "Safe Water";
  } else {
    quality = "Unsafe Water";
  }

  Blynk.virtualWrite(V1, ph);
  Blynk.virtualWrite(V2, turbidity);
  Blynk.virtualWrite(V3, quality);

  Blynk.run();
  delay(1000);
}
Real-world uses
- Drinking water tanks
- Aquariums and fish farms
- Water purifier checks
- Environmental science projects
Frequently asked questions
What is a IoT Water Quality Monitoring System?
A real-time water quality monitor. A pH sensor measures how acidic or alkaline the water is, and a turbidity sensor measures how cloudy it is.
What components are needed for the IoT Water Quality Monitoring System?
You need: ESP32 Dev Board (1), pH Sensor Module (1), Turbidity Sensor (1), Jumper Wires / Breadboard, Power Supply (1). Software: Arduino IDE, Blynk IoT app.
Is the IoT Water Quality Monitoring System project good for beginners?
It is rated intermediate and takes about 2–3 hours to build, using the ESP32. The guide on this page explains every connection and step.
Where can I get the code for the IoT Water Quality Monitoring System?
The complete, tested Arduino C++ code is free on this page. Copy it into Arduino IDE and upload it to the board.
Can I buy a kit for the IoT Water Quality Monitoring System?
Yes. IRI sells a kit with the parts for this project (PRJ-137). Message IRI on WhatsApp at +91 86060 82634 for the kit price and delivery details.