
Plant Watering System (ESP32, Auto Mode)
Checks the soil every second and runs the pump only when it is dry.
Built and tested by Drisya K S · Industrial Robotics Institute
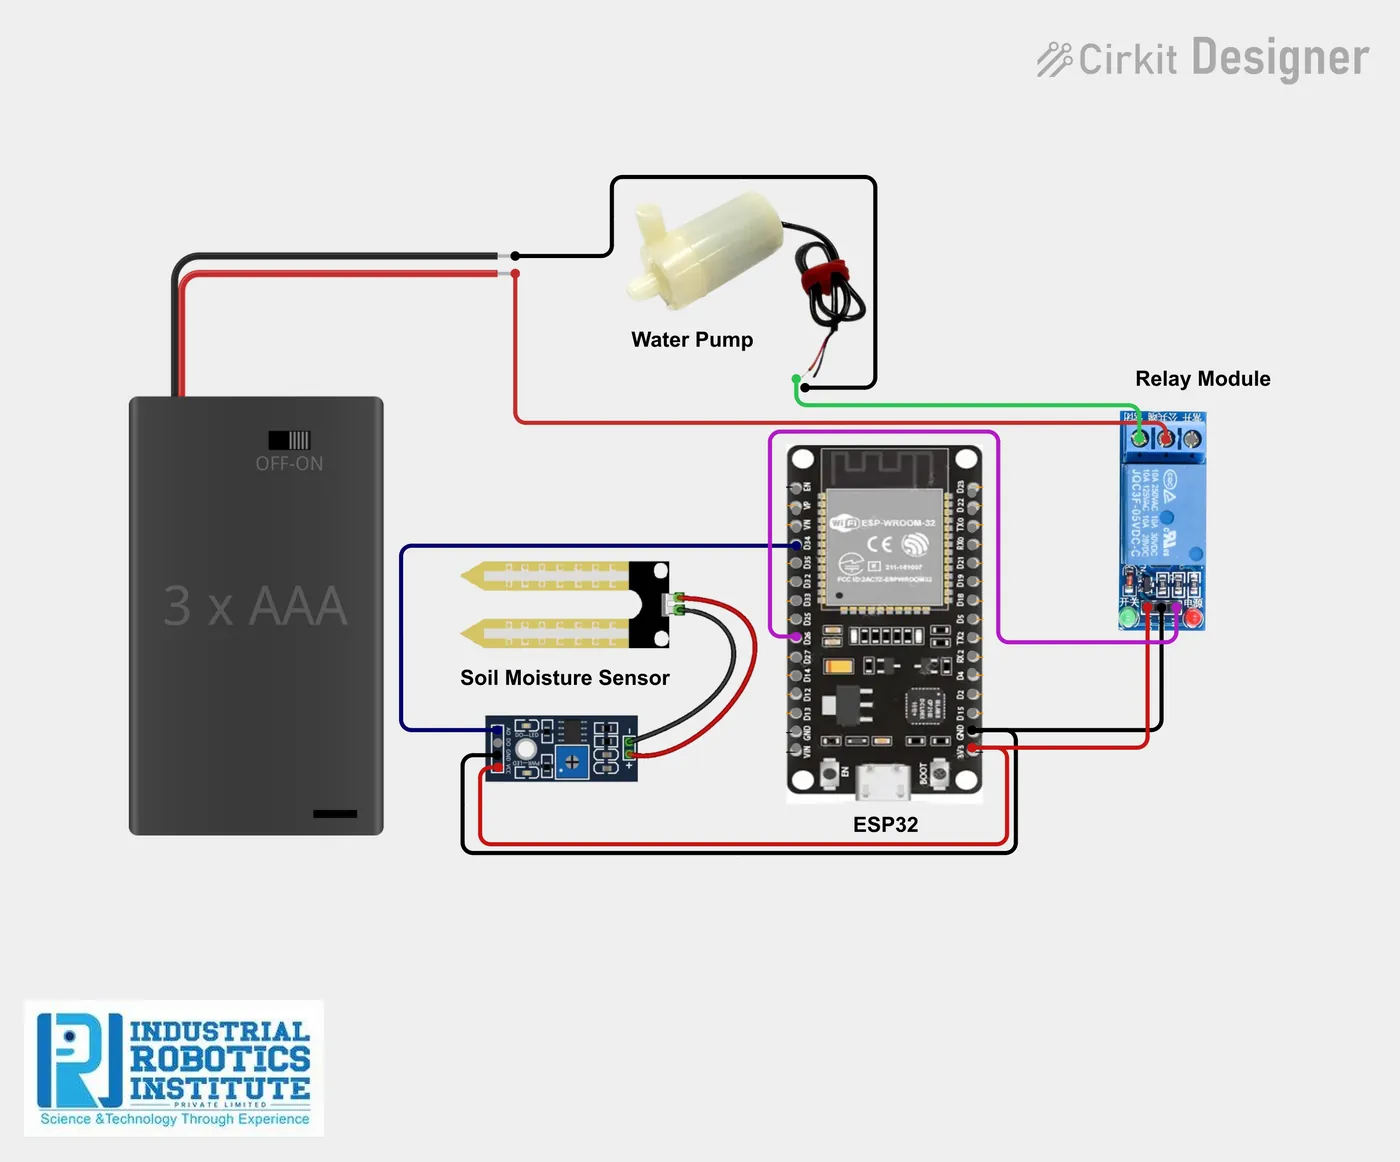
What is the Plant Watering System (ESP32, Auto Mode)?
A fully automatic plant watering system using an ESP32. A soil moisture sensor reports how wet the soil is; when it crosses your calibrated dry level, a relay switches on a DC pump, and switches it off again once the soil is wet. Live readings appear in the Serial Monitor.
How it works
- The soil moisture sensor gives an analog value on GPIO 34.
- The ESP32 prints the value every second.
- If it is above the threshold (dry soil), the relay turns the pump on.
- When it falls below the threshold (wet soil), the pump turns off.
Parts list
| Component | Qty |
|---|---|
| ESP32 Dev Board | 1 |
| Soil Moisture Sensor | 1 |
| 5V Single-Channel Relay Module | 1 |
| DC Water Pump | 1 |
| Jumper Wires | As needed |
| Breadboard (optional) | 1 |
| External Power Supply (5–12V for pump) | 1 |
Software
- Arduino IDE
- ESP32 board package
Wiring and connections
| From | Connect to |
|---|---|
| Moisture sensor VCC | 3.3V |
| Moisture sensor GND | GND |
| Moisture sensor AO | GPIO 34 |
| Relay VCC | 5V |
| Relay GND | GND |
| Relay IN | GPIO 26 |
| Relay COM | External supply + |
| Relay NO | Pump + |
| Pump − | External supply − |
How to build the Plant Watering System (ESP32, Auto Mode)
- Connect the soil sensor to 3.3V, GND and GPIO 34.
- Connect the relay to 5V, GND and GPIO 26.
- Wire the pump through the relay’s COM and NO terminals to its own supply; keep grounds common.
- Upload the code and open the Serial Monitor at 115200 baud.
- Note readings in dry and wet soil and set threshold between them.
- Place the pump in a water container and the pipe at the plant.
Plant Watering System (ESP32, Auto Mode) code
Complete, tested Arduino C++ code for this project. Copy it into Arduino IDE and upload it to the ESP32.
#define soilPin 34
#define relayPin 26

int threshold = 500;   // calibrate for your sensor and soil

void setup() {
  Serial.begin(115200);
  pinMode(relayPin, OUTPUT);
  Serial.println("Plant Watering System Started");
}

void loop() {
  int soilValue = analogRead(soilPin);

  Serial.print("Soil Moisture Value: ");
  Serial.println(soilValue);

  if (soilValue > threshold) {
    digitalWrite(relayPin, HIGH);
    Serial.println("Soil Dry - Pump ON");
  } else {
    digitalWrite(relayPin, LOW);
    Serial.println("Soil Wet - Pump OFF");
  }

  delay(1000);
}
Real-world uses
- Home and balcony gardens
- Nurseries
- School garden projects
- Smart farming demos
Frequently asked questions
What is a Plant Watering System (ESP32, Auto Mode)?
A fully automatic plant watering system using an ESP32. A soil moisture sensor reports how wet the soil is; when it crosses your calibrated dry level, a relay switches on a DC pump, and switches it off again once the soil is wet.
What components are needed for the Plant Watering System (ESP32, Auto Mode)?
You need: ESP32 Dev Board (1), Soil Moisture Sensor (1), 5V Single-Channel Relay Module (1), DC Water Pump (1), Jumper Wires, Breadboard (optional) (1), External Power Supply (5–12V for pump) (1). Software: Arduino IDE, ESP32 board package.
Is the Plant Watering System (ESP32, Auto Mode) project good for beginners?
Yes. It is rated beginner and takes about 1–2 hours to build, using the ESP32. The guide on this page explains every connection and step.
Where can I get the code for the Plant Watering System (ESP32, Auto Mode)?
The complete, tested Arduino C++ code is free on this page. Copy it into Arduino IDE and upload it to the board.
Can I buy a kit for the Plant Watering System (ESP32, Auto Mode)?
Yes. IRI sells a kit with the parts for this project (PRJ-132). Message IRI on WhatsApp at +91 86060 82634 for the kit price and delivery details.