
IoT Smart Animal Intrusion Detection Using ESP32
Detects animals entering a farm and scares them off with a buzzer and light.
Built and tested by Drisya K S · Industrial Robotics Institute
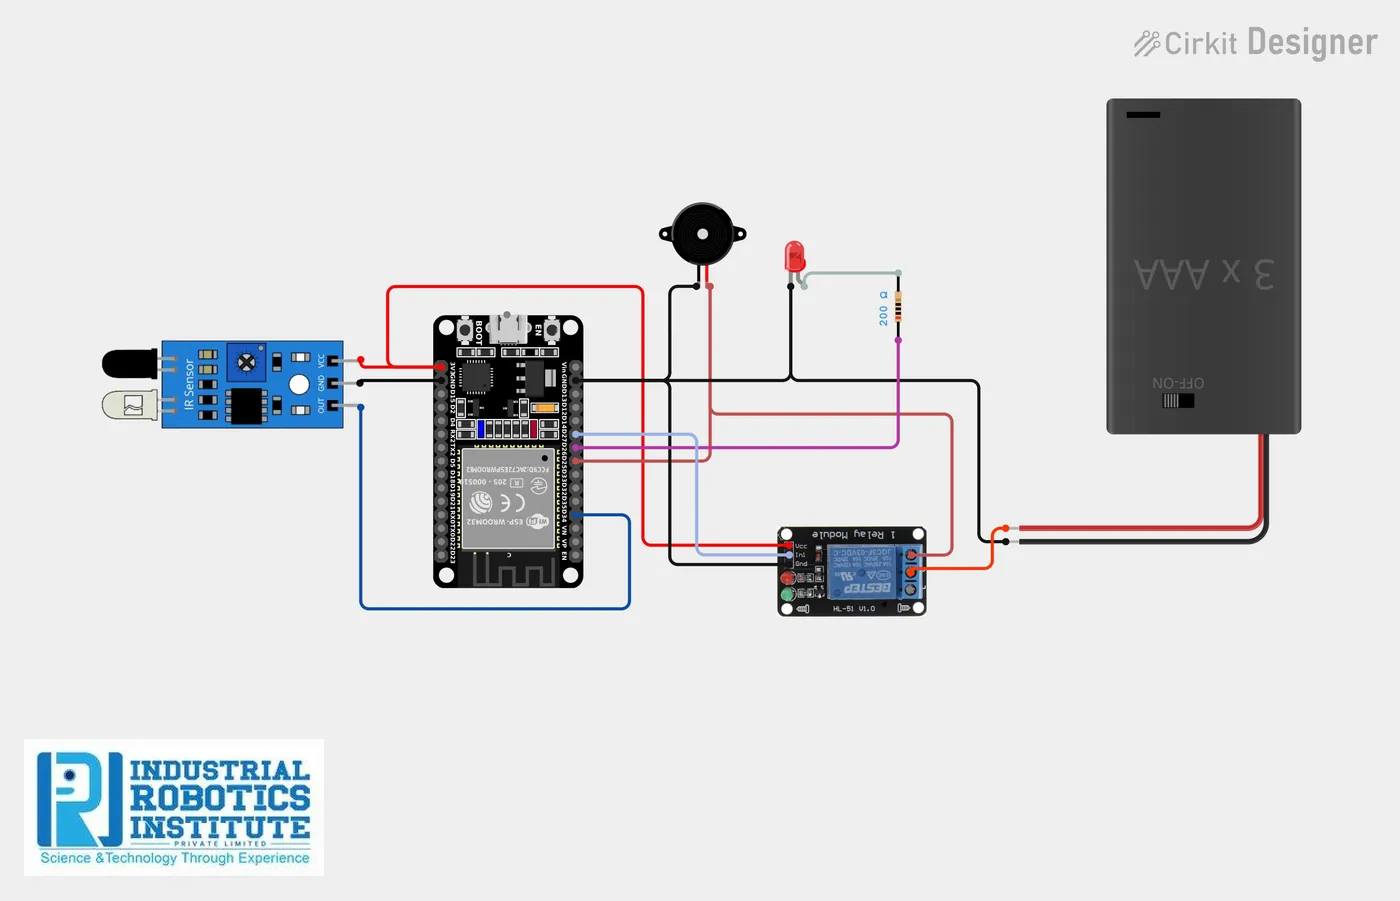
What is the IoT Smart Animal Intrusion Detection?
A farm protection system that detects cows, goats, dogs, monkeys or wild animals crossing the boundary. An IR or PIR sensor watches the edge of the field; when something is detected, the ESP32 sounds a buzzer, lights an LED and can switch on a siren or floodlight through a relay.
How it works
- The IR/PIR sensor at the farm boundary watches for movement.
- The ESP32 reads it every second.
- When an animal is detected (sensor output LOW), the buzzer, LED and relay turn on.
- The Serial Monitor shows "Animal Detected!" or "No Intrusion".
Parts list
| Component | Qty |
|---|---|
| ESP32 Dev Board | 1 |
| IR or PIR Motion Sensor | 1 |
| Buzzer | 1 |
| LED (optional) | 1 |
| Resistor 220Ω (for LED) | 1 |
| Relay Module (optional, for siren/light) | 1 |
| Jumper Wires | As needed |
| Power Supply (5V / battery) | 1 |
Software
- Arduino IDE
Wiring and connections
| From | Connect to |
|---|---|
| Sensor VCC | 3.3V |
| Sensor GND | GND |
| Sensor OUT | GPIO 34 |
| Buzzer + | GPIO 25 |
| Buzzer − | GND |
| LED + (via resistor) | GPIO 26 |
| Relay IN | GPIO 27 |
| Relay VCC / GND | 5V / GND |
How to build the IoT Smart Animal Intrusion Detection
- Connect the sensor output to GPIO 34.
- Connect the buzzer to GPIO 25, the LED to GPIO 26 and the optional relay to GPIO 27.
- Upload the code and open the Serial Monitor at 115200 baud.
- Walk past the sensor to test; flip LOW/HIGH in the code if your sensor works the other way.
- Mount it at the farm boundary in a weatherproof box.
IoT Smart Animal Intrusion Detection code
Complete, tested Arduino C++ code for this project. Copy it into Arduino IDE and upload it to the ESP32.
int sensorPin = 34;
int buzzer = 25;
int led = 26;
int relay = 27;

void setup() {
  Serial.begin(115200);
  pinMode(sensorPin, INPUT);
  pinMode(buzzer, OUTPUT);
  pinMode(led, OUTPUT);
  pinMode(relay, OUTPUT);
  Serial.println("Animal Intrusion Detection System Started");
}

void loop() {
  int intrusion = digitalRead(sensorPin);

  if (intrusion == LOW) {          // animal detected
    digitalWrite(buzzer, HIGH);
    digitalWrite(led, HIGH);
    digitalWrite(relay, HIGH);
    Serial.println("Animal Detected!");
  } else {
    digitalWrite(buzzer, LOW);
    digitalWrite(led, LOW);
    digitalWrite(relay, LOW);
    Serial.println("No Intrusion");
  }

  delay(1000);
}
Real-world uses
- Farms and crop fields
- Plantations
- Poultry and cattle sheds
- Home gardens
Frequently asked questions
What is a IoT Smart Animal Intrusion Detection?
A farm protection system that detects cows, goats, dogs, monkeys or wild animals crossing the boundary. An IR or PIR sensor watches the edge of the field; when something is detected, the ESP32 sounds a buzzer, lights an LED and can switch on a siren or floodlight through a relay.
What components are needed for the IoT Smart Animal Intrusion Detection?
You need: ESP32 Dev Board (1), IR or PIR Motion Sensor (1), Buzzer (1), LED (optional) (1), Resistor 220Ω (for LED) (1), Relay Module (optional, for siren/light) (1), Jumper Wires, Power Supply (5V / battery) (1). Software: Arduino IDE.
Is the IoT Smart Animal Intrusion Detection project good for beginners?
Yes. It is rated beginner and takes about 1–2 hours to build, using the ESP32. The guide on this page explains every connection and step.
Where can I get the code for the IoT Smart Animal Intrusion Detection?
The complete, tested Arduino C++ code is free on this page. Copy it into Arduino IDE and upload it to the board.
Can I buy a kit for the IoT Smart Animal Intrusion Detection?
Yes. IRI sells a kit with the parts for this project (PRJ-133). Message IRI on WhatsApp at +91 86060 82634 for the kit price and delivery details.