
Automatic Safe Locker Using Arduino
A keypad locker with EEPROM password, OTP verification and tamper alert.
Built and tested by Anju.A · Industrial Robotics Institute
What is the Automatic Safe Locker?
The Safe Locker System protects valuables using multi-level authentication with a password and a One-Time Password (OTP). An Arduino Uno reads keypad input, verifies the password stored in its internal EEPROM, and controls a servo-driven lock. A tamper switch triggers a buzzer alert to detect unauthorized access attempts.
How it works
- The user enters a 4-digit password on the keypad, which is checked against the copy stored in EEPROM.
- If correct, the Arduino generates a random 4-digit OTP and shows it on the LCD.
- The user enters the OTP; if it matches, the servo turns to 90° to open the lock for 3 seconds, then relocks.
- A wrong password or OTP shows an error on the LCD and sounds the buzzer for 2 seconds.
- Pressing the tamper switch shows ‘TAMPER ALERT!’ and sounds the buzzer.
Parts list
| Component | Qty |
|---|---|
| Arduino Uno | 1 |
| Keypad (4×4 Matrix) | 1 |
| LCD Display (16×2 I2C) | 1 |
| Servo Motor | 1 |
| Buzzer | 1 |
| Push Button (Tamper Switch) | 1 |
| Connecting Wires | As needed |
| Power Supply | 1 |
Software
- Arduino IDE
- Wire library
- LiquidCrystal_I2C library
- Keypad library
- EEPROM library
- Servo library
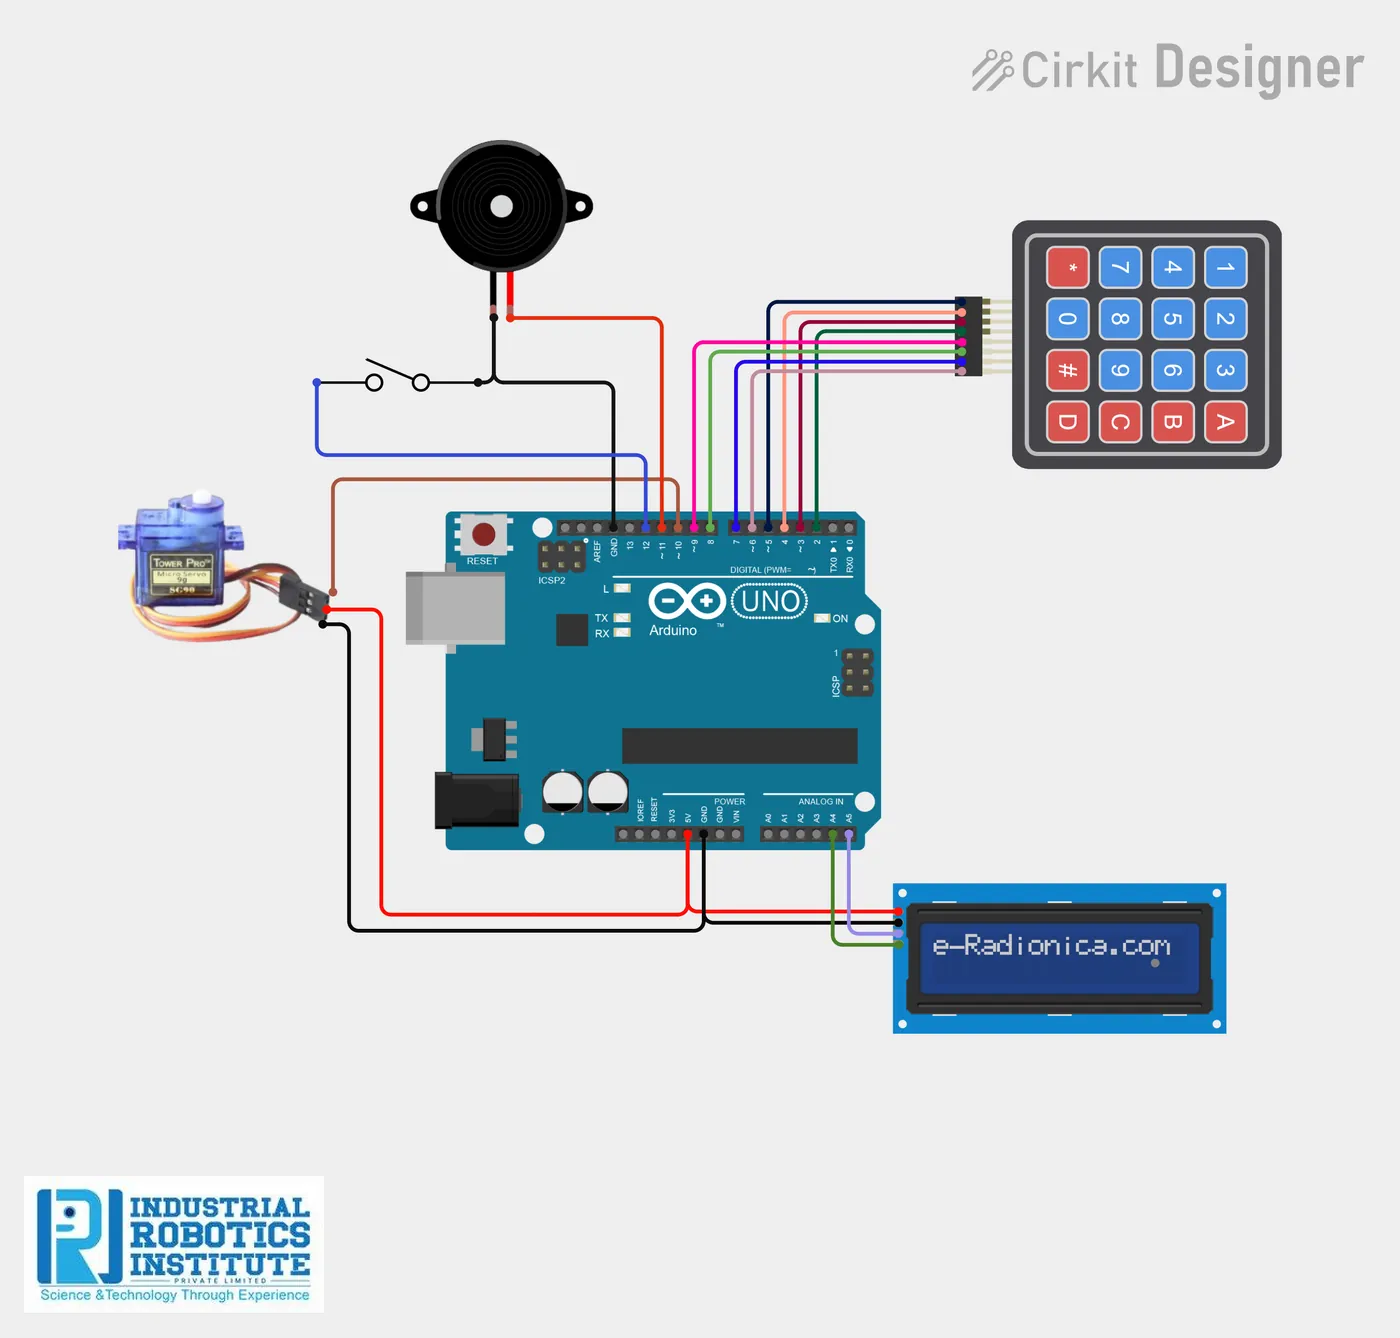
Wiring and connections
| From | Connect to |
|---|---|
| Keypad Rows | D2, D3, D4, D5 |
| Keypad Columns | D6, D7, D8, D9 |
| LCD SDA | A4 |
| LCD SCL | A5 |
| Servo Signal | D10 |
| Servo VCC | 5V |
| Servo GND | GND |
| Buzzer + | D11 |
| Buzzer – | GND |
| Tamper Switch (side 1) | D12 |
| Tamper Switch (side 2) | GND |
How to build the Automatic Safe Locker
- Connect the 4×4 keypad rows to D2–D5 and columns to D6–D9.
- Connect the 16×2 I2C LCD SDA to A4 and SCL to A5, plus 5V and GND.
- Connect the servo signal to D10, VCC to 5V and GND to GND, and fit it to the locker latch.
- Connect the buzzer to D11 and the tamper push button between D12 and GND.
- Install the LiquidCrystal_I2C and Keypad libraries and upload the code with the Arduino IDE.
- Enter the password 1234, read the OTP on the LCD, then enter the OTP to open the lock.
- Press the tamper switch to test the alert.
Automatic Safe Locker code
Complete, tested Arduino C++ code for this project. Copy it into Arduino IDE and upload it to the Arduino Uno.
#include <Wire.h>
#include <LiquidCrystal_I2C.h>
#include <Keypad.h>
#include <EEPROM.h>
#include <Servo.h>

LiquidCrystal_I2C lcd(0x27,16,2);
Servo lockMotor;

const byte rows = 4;
const byte cols = 4;

char keys[rows][cols] = {
  {'1','2','3','A'},
  {'4','5','6','B'},
  {'7','8','9','C'},
  {'*','0','#','D'}
};

byte rowPins[rows] = {2,3,4,5};
byte colPins[cols] = {6,7,8,9};

Keypad keypad = Keypad(makeKeymap(keys), rowPins, colPins, rows, cols);

String input = "";
String otp = "";
String password = "1234";

int buzzer = 11;
int tamperPin = 12;

int state = 0; // 0 = Password, 1 = OTP

void setup() {
  lcd.init();
  lcd.backlight();

  lockMotor.attach(10);

  pinMode(buzzer, OUTPUT);
  pinMode(tamperPin, INPUT_PULLUP);

  for(int i=0;i<4;i++){
    EEPROM.write(i, password[i]);
  }

  lcd.print("Enter Password");
}

void loop() {

  // Tamper detection
  if(digitalRead(tamperPin) == LOW){
    lcd.clear();
    lcd.print("TAMPER ALERT!");
    digitalWrite(buzzer, HIGH);
    delay(2000);
    digitalWrite(buzzer, LOW);
  }

  char key = keypad.getKey();

  if(key){
    input += key;

    lcd.setCursor(0,1);
    lcd.print(input);

    // Password check
    if(state == 0 && input.length() == 4){

      bool correct = true;
      for(int i=0;i<4;i++){
        if(input[i] != EEPROM.read(i)){
          correct = false;
        }
      }

      if(correct){
        lcd.clear();
        lcd.print("Password OK");

        randomSeed(analogRead(A0));
        otp = String(random(1000,9999));

        delay(1000);

        lcd.clear();
        lcd.print("OTP:");
        lcd.print(otp);

        delay(3000);

        lcd.clear();
        lcd.print("Enter OTP");

        input = "";
        state = 1;
      }
      else{
        lcd.clear();
        lcd.print("Wrong Password");
        digitalWrite(buzzer, HIGH);
        delay(2000);
        digitalWrite(buzzer, LOW);

        input = "";
        lcd.clear();
        lcd.print("Enter Password");
      }
    }

    // OTP check
    else if(state == 1 && input.length() == 4){

      if(input == otp){
        lcd.clear();
        lcd.print("Access Granted");

        lockMotor.write(90);
        delay(3000);
        lockMotor.write(0);
      }
      else{
        lcd.clear();
        lcd.print("Wrong OTP");
        digitalWrite(buzzer, HIGH);
        delay(2000);
        digitalWrite(buzzer, LOW);
      }

      input = "";
      otp = "";
      state = 0;

      lcd.clear();
      lcd.print("Enter Password");
    }
  }
}
Real-world uses
- Home safe for valuables
- Office document lockers
- Bank or hotel lockers
- Secure storage boxes
Frequently asked questions
What is a Automatic Safe Locker?
The Safe Locker System protects valuables using multi-level authentication with a password and a One-Time Password (OTP). An Arduino Uno reads keypad input, verifies the password stored in its internal EEPROM, and controls a servo-driven lock.
What components are needed for the Automatic Safe Locker?
You need: Arduino Uno (1), Keypad (4×4 Matrix) (1), LCD Display (16×2 I2C) (1), Servo Motor (1), Buzzer (1), Push Button (Tamper Switch) (1), Connecting Wires, Power Supply (1). Software: Arduino IDE, Wire library, LiquidCrystal_I2C library, Keypad library, EEPROM library, Servo library.
Is the Automatic Safe Locker project good for beginners?
It is rated intermediate and takes about 3–4 hours to build, using the Arduino Uno. The guide on this page explains every connection and step.
Where can I get the code for the Automatic Safe Locker?
The complete, tested Arduino C++ code is free on this page. Copy it into Arduino IDE and upload it to the board.
Can I buy a kit for the Automatic Safe Locker?
Yes. IRI sells a kit with the parts for this project (PRJ-140). Message IRI on WhatsApp at +91 86060 82634 for the kit price and delivery details.