
IoT Digital Notice Board (ESP8266 + OLED)
Type a message on your phone and it scrolls across the notice board.
Built and tested by Anju.A · Industrial Robotics Institute
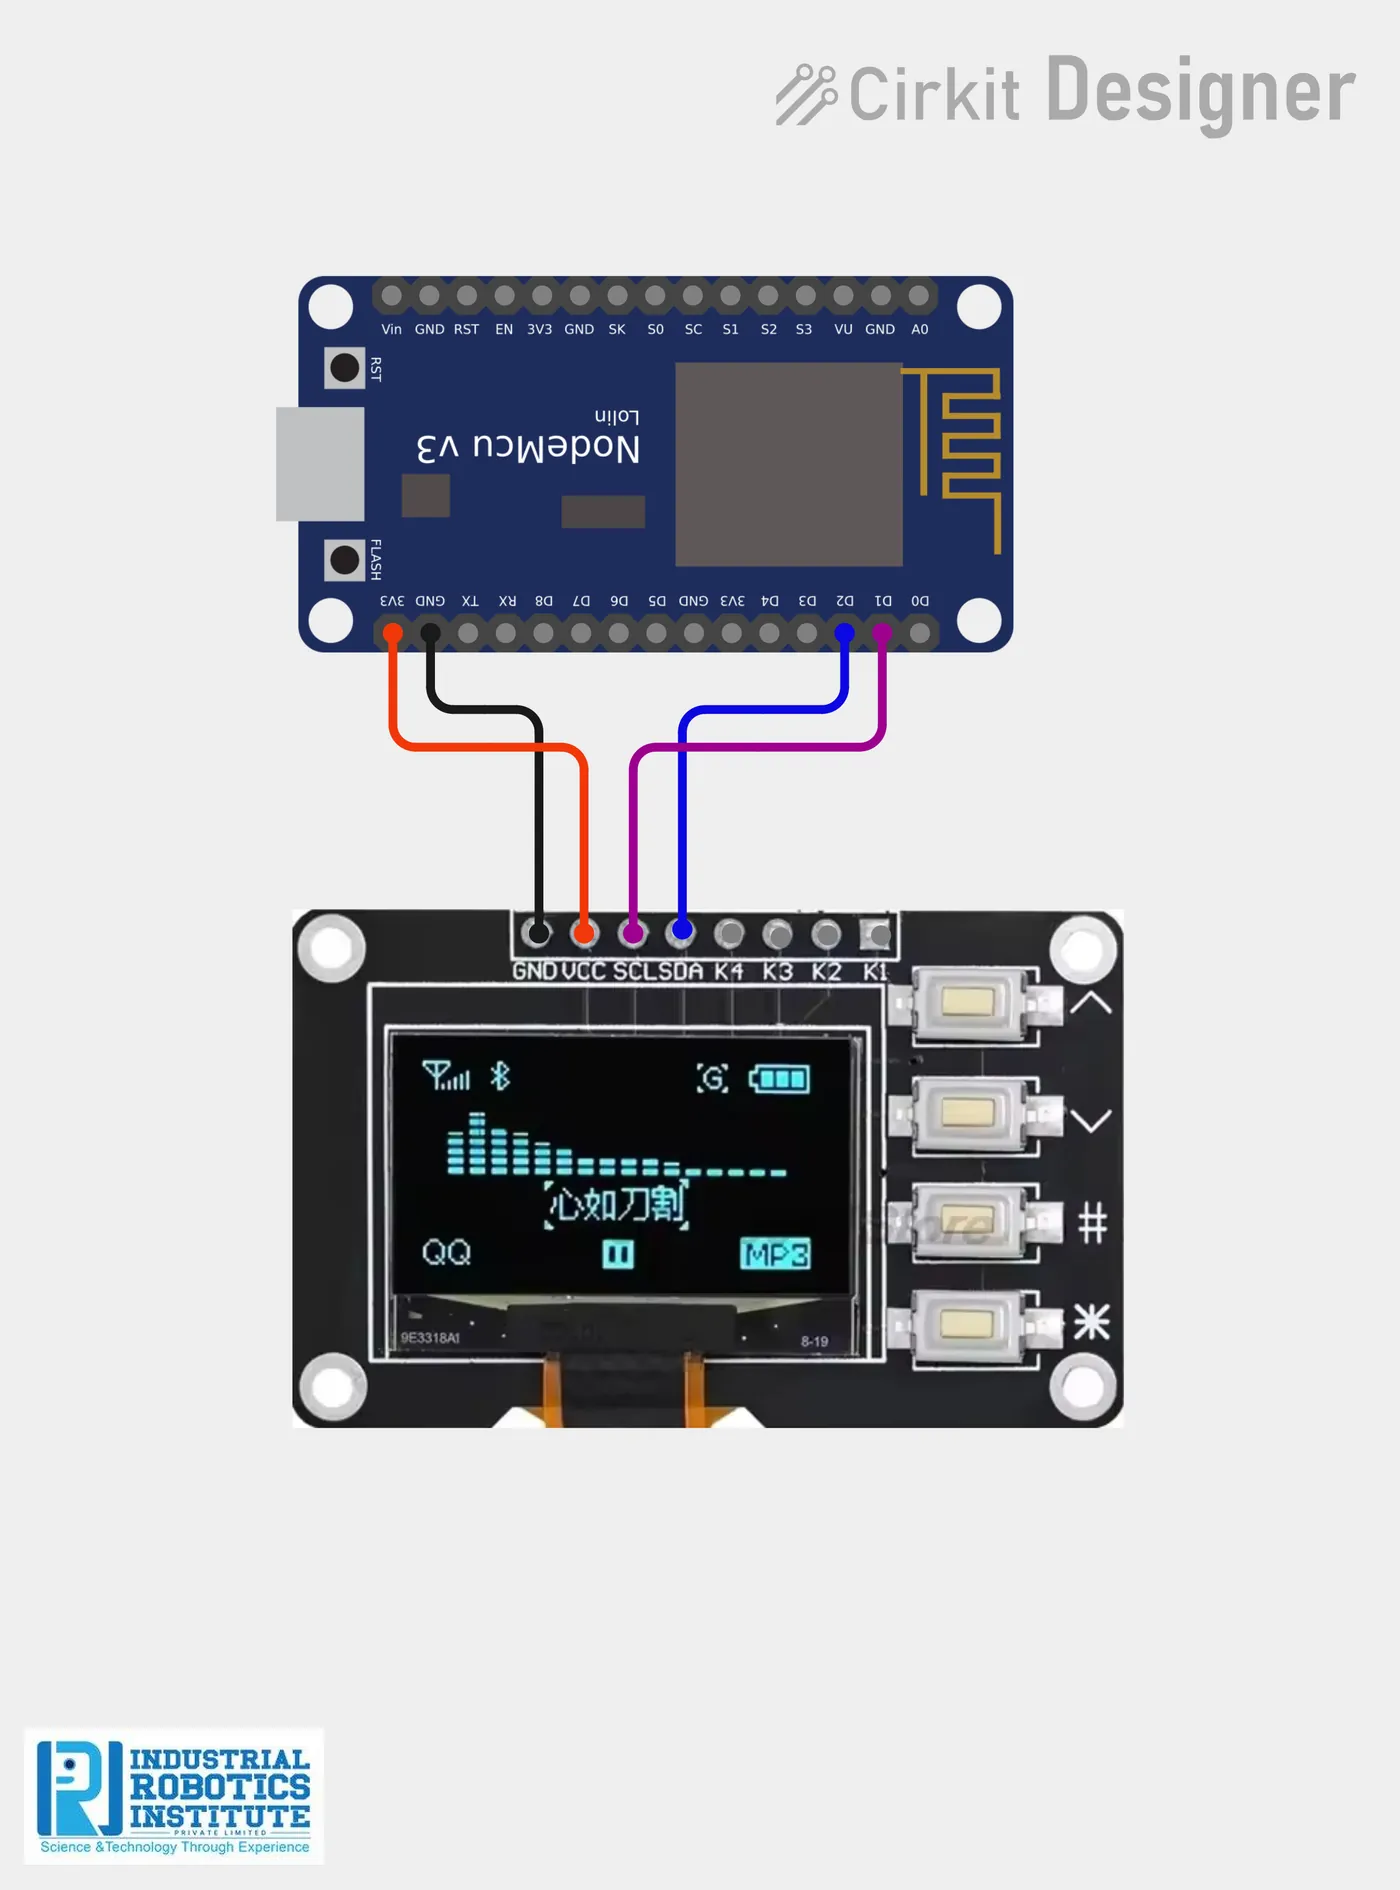
What is the IoT Digital Notice Board (ESP8266 + OLED)?
A wireless notice board. The ESP8266 hosts a simple web page with a text box; type a message on any phone or laptop on the same Wi-Fi and press Send, and it appears scrolling across an OLED display. No more paper notices.
How it works
- The ESP8266 joins your Wi-Fi and shows "Connected!" on the OLED.
- Opening its IP address shows a page with a message box.
- Pressing Send passes the text to the ESP8266.
- The OLED shows "Digital Notice" at the top and scrolls your message across the screen.
Parts list
| Component | Qty |
|---|---|
| ESP8266 NodeMCU | 1 |
| OLED Display (SSD1306, 0.96", I2C) | 1 |
| Jumper Wires | As needed |
| Breadboard | 1 |
| Power Supply | 1 |
Software
- Arduino IDE
- ESP8266 board package
- Adafruit GFX library
- Adafruit SSD1306 library
Wiring and connections
| From | Connect to |
|---|---|
| OLED VCC | 3.3V |
| OLED GND | GND |
| OLED SDA | D2 (GPIO4) |
| OLED SCL | D1 (GPIO5) |
How to build the IoT Digital Notice Board (ESP8266 + OLED)
- Connect the OLED to 3.3V, GND, D2 (SDA) and D1 (SCL).
- Install the Adafruit GFX and SSD1306 libraries.
- Put your Wi-Fi name and password in the code and upload it.
- Open the Serial Monitor at 115200 baud to see the IP address.
- Open the IP on your phone, type a message and press Send.
IoT Digital Notice Board (ESP8266 + OLED) code
Complete, tested Arduino C++ code for this project. Copy it into Arduino IDE and upload it to the ESP8266 NodeMCU.
#include <ESP8266WiFi.h>
#include <ESP8266WebServer.h>
#include <Wire.h>
#include <Adafruit_GFX.h>
#include <Adafruit_SSD1306.h>

#define SCREEN_WIDTH 128
#define SCREEN_HEIGHT 64
Adafruit_SSD1306 display(SCREEN_WIDTH, SCREEN_HEIGHT, &Wire, -1);

const char* ssid = "YOUR_WIFI_NAME";
const char* password = "YOUR_WIFI_PASSWORD";

ESP8266WebServer server(80);

String message = "Welcome";
int xPos = 128;

void handleRoot() {
  String page = "<html><body>";
  page += "<h2>IoT Notice Board</h2>";
  page += "<form action='/update'>";
  page += "<input type='text' name='msg'>";
  page += "<input type='submit' value='Send'>";
  page += "</form></body></html>";
  server.send(200, "text/html", page);
}

void handleUpdate() {
  if (server.hasArg("msg")) {
    message = server.arg("msg");
  }
  server.send(200, "text/html", "Message Updated <a href='/'>Back</a>");
}

void setup() {
  Serial.begin(115200);

  if (!display.begin(SSD1306_SWITCHCAPVCC, 0x3C)) {
    while (true);
  }
  display.clearDisplay();
  display.setTextColor(WHITE);
  display.setTextSize(1);
  display.setCursor(0, 0);
  display.print("Connecting WiFi...");
  display.display();

  WiFi.begin(ssid, password);
  while (WiFi.status() != WL_CONNECTED) {
    delay(500);
  }
  Serial.println(WiFi.localIP());

  display.clearDisplay();
  display.setCursor(0, 0);
  display.print("Connected!");
  display.display();
  delay(2000);

  server.on("/", handleRoot);
  server.on("/update", handleUpdate);
  server.begin();
}

void loop() {
  server.handleClient();

  display.clearDisplay();
  display.setTextSize(1);
  display.setCursor(0, 0);
  display.print("Digital Notice");

  display.setTextSize(2);
  display.setTextWrap(false);
  display.setCursor(xPos, 25);
  display.print(message);
  display.display();

  xPos -= 3;
  if (xPos < -(int)(message.length() * 12)) {
    xPos = 128;
  }

  delay(100);
}
Real-world uses
- Schools and colleges
- Offices and reception areas
- Shops and restaurants
- Railway and bus stations
Frequently asked questions
What is a IoT Digital Notice Board (ESP8266 + OLED)?
A wireless notice board. The ESP8266 hosts a simple web page with a text box; type a message on any phone or laptop on the same Wi-Fi and press Send, and it appears scrolling across an OLED display.
What components are needed for the IoT Digital Notice Board (ESP8266 + OLED)?
You need: ESP8266 NodeMCU (1), OLED Display (SSD1306, 0.96", I2C) (1), Jumper Wires, Breadboard (1), Power Supply (1). Software: Arduino IDE, ESP8266 board package, Adafruit GFX library, Adafruit SSD1306 library.
Is the IoT Digital Notice Board (ESP8266 + OLED) project good for beginners?
It is rated intermediate and takes about 2–3 hours to build, using the ESP8266 NodeMCU. The guide on this page explains every connection and step.
Where can I get the code for the IoT Digital Notice Board (ESP8266 + OLED)?
The complete, tested Arduino C++ code is free on this page. Copy it into Arduino IDE and upload it to the board.
Can I buy a kit for the IoT Digital Notice Board (ESP8266 + OLED)?
Yes. IRI sells a kit with the parts for this project (PRJ-143). Message IRI on WhatsApp at +91 86060 82634 for the kit price and delivery details.