
Traffic Light System Using Arduino
Red, yellow and green LEDs that cycle just like a real road signal.
Built and tested by Anju.A · Industrial Robotics Institute
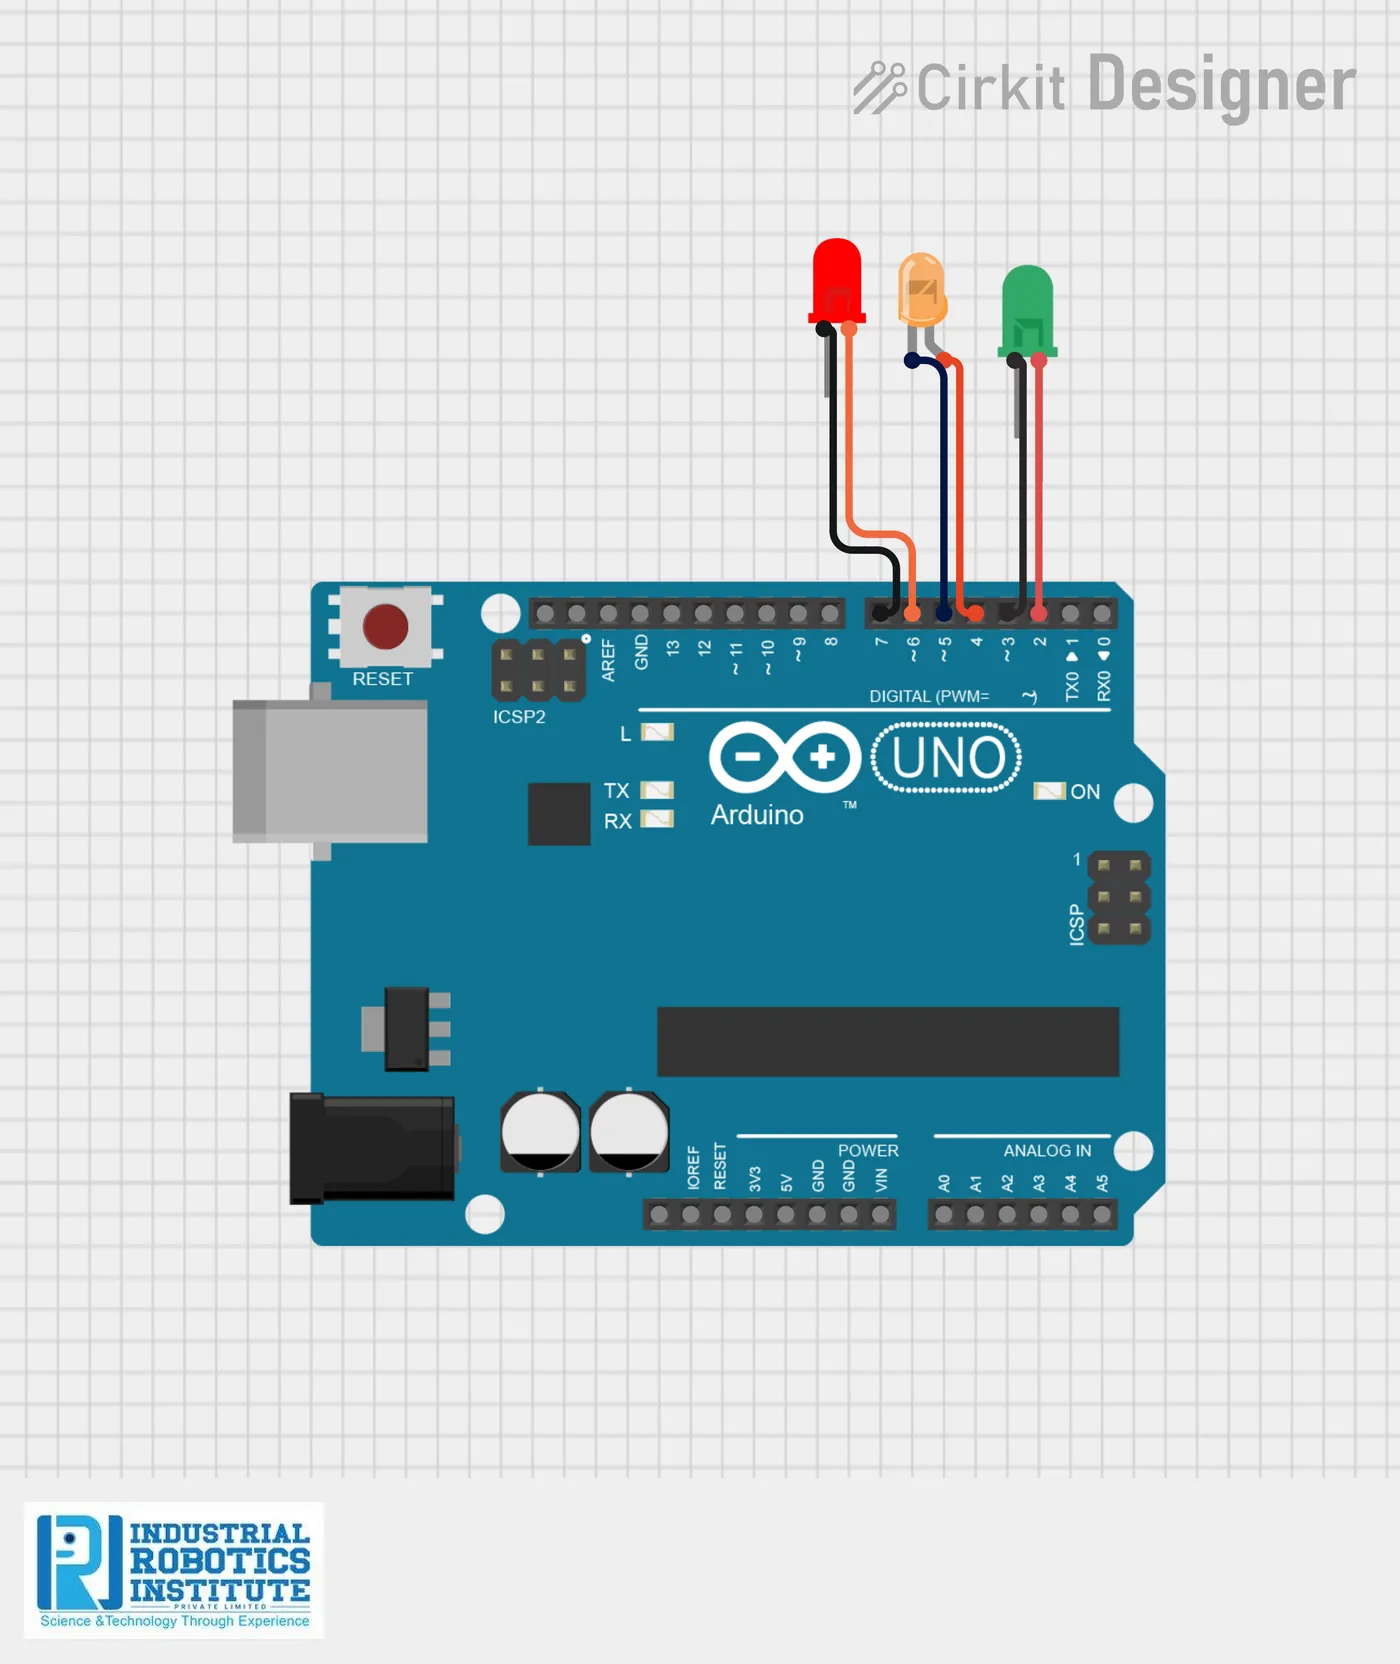
What is the Traffic Light System?
Traffic lights control vehicles and pedestrians at road junctions. This beginner project builds a working model with an Arduino and three LEDs. The program switches green, yellow and red on in the same order and timing as a real signal, then repeats.
How it works
- Green turns on for 5 seconds to let vehicles go.
- Yellow turns on for 2 seconds as a warning.
- Red turns on for 5 seconds to stop vehicles.
- The sequence repeats forever, timed with delay().
Parts list
| Component | Qty |
|---|---|
| Arduino Uno | 1 |
| Red LED | 1 |
| Yellow LED | 1 |
| Green LED | 1 |
| Breadboard | 1 |
| Jumper Wires | As needed |
| USB Cable | 1 |
Software
- Arduino IDE
Wiring and connections
| From | Connect to |
|---|---|
| Green LED + | Pin 2 |
| Green LED − | Pin 3 |
| Yellow LED + | Pin 4 |
| Yellow LED − | Pin 5 |
| Red LED + | Pin 6 |
| Red LED − | Pin 7 |
How to build the Traffic Light System
- Place the three LEDs on the breadboard in the order red, yellow, green.
- Connect each LED’s long leg (+) and short leg (−) to the Arduino pins in the wiring table.
- Connect the Arduino to your computer with the USB cable.
- Upload the code from the Arduino IDE.
- Watch the lights cycle; change the delay values to change the timing.
Traffic Light System code
Complete, tested Arduino C++ code for this project. Copy it into Arduino IDE and upload it to the Arduino Uno.
int greenPos = 2;
int greenNeg = 3;

int yellowPos = 4;
int yellowNeg = 5;

int redPos = 6;
int redNeg = 7;

void setup()
{
  pinMode(greenPos, OUTPUT);
  pinMode(greenNeg, OUTPUT);
  pinMode(yellowPos, OUTPUT);
  pinMode(yellowNeg, OUTPUT);
  pinMode(redPos, OUTPUT);
  pinMode(redNeg, OUTPUT);
}

void loop()
{
  // GREEN LIGHT
  digitalWrite(greenPos, HIGH);  digitalWrite(greenNeg, LOW);
  digitalWrite(yellowPos, LOW);  digitalWrite(yellowNeg, LOW);
  digitalWrite(redPos, LOW);     digitalWrite(redNeg, LOW);
  delay(5000);

  // YELLOW LIGHT
  digitalWrite(greenPos, LOW);   digitalWrite(greenNeg, LOW);
  digitalWrite(yellowPos, HIGH); digitalWrite(yellowNeg, LOW);
  digitalWrite(redPos, LOW);     digitalWrite(redNeg, LOW);
  delay(2000);

  // RED LIGHT
  digitalWrite(greenPos, LOW);   digitalWrite(greenNeg, LOW);
  digitalWrite(yellowPos, LOW);  digitalWrite(yellowNeg, LOW);
  digitalWrite(redPos, HIGH);    digitalWrite(redNeg, LOW);
  delay(5000);
}
Real-world uses
- Road safety lessons
- First Arduino project
- School science models
- Learning timing and sequencing
Frequently asked questions
What is a Traffic Light System?
Traffic lights control vehicles and pedestrians at road junctions. This beginner project builds a working model with an Arduino and three LEDs.
What components are needed for the Traffic Light System?
You need: Arduino Uno (1), Red LED (1), Yellow LED (1), Green LED (1), Breadboard (1), Jumper Wires, USB Cable (1). Software: Arduino IDE.
Is the Traffic Light System project good for beginners?
Yes. It is rated beginner and takes about 30–60 minutes to build, using the Arduino Uno. The guide on this page explains every connection and step.
Where can I get the code for the Traffic Light System?
The complete, tested Arduino C++ code is free on this page. Copy it into Arduino IDE and upload it to the board.
Can I buy a kit for the Traffic Light System?
Yes. IRI sells a kit with the parts for this project (PRJ-010). Message IRI on WhatsApp at +91 86060 82634 for the kit price and delivery details.