
IoT Temperature Monitoring (Cloud + Webpage) Using ESP8266
Shows room temperature on a local web page and logs it to a ThingSpeak graph.
Built and tested by Anju.A · Industrial Robotics Institute
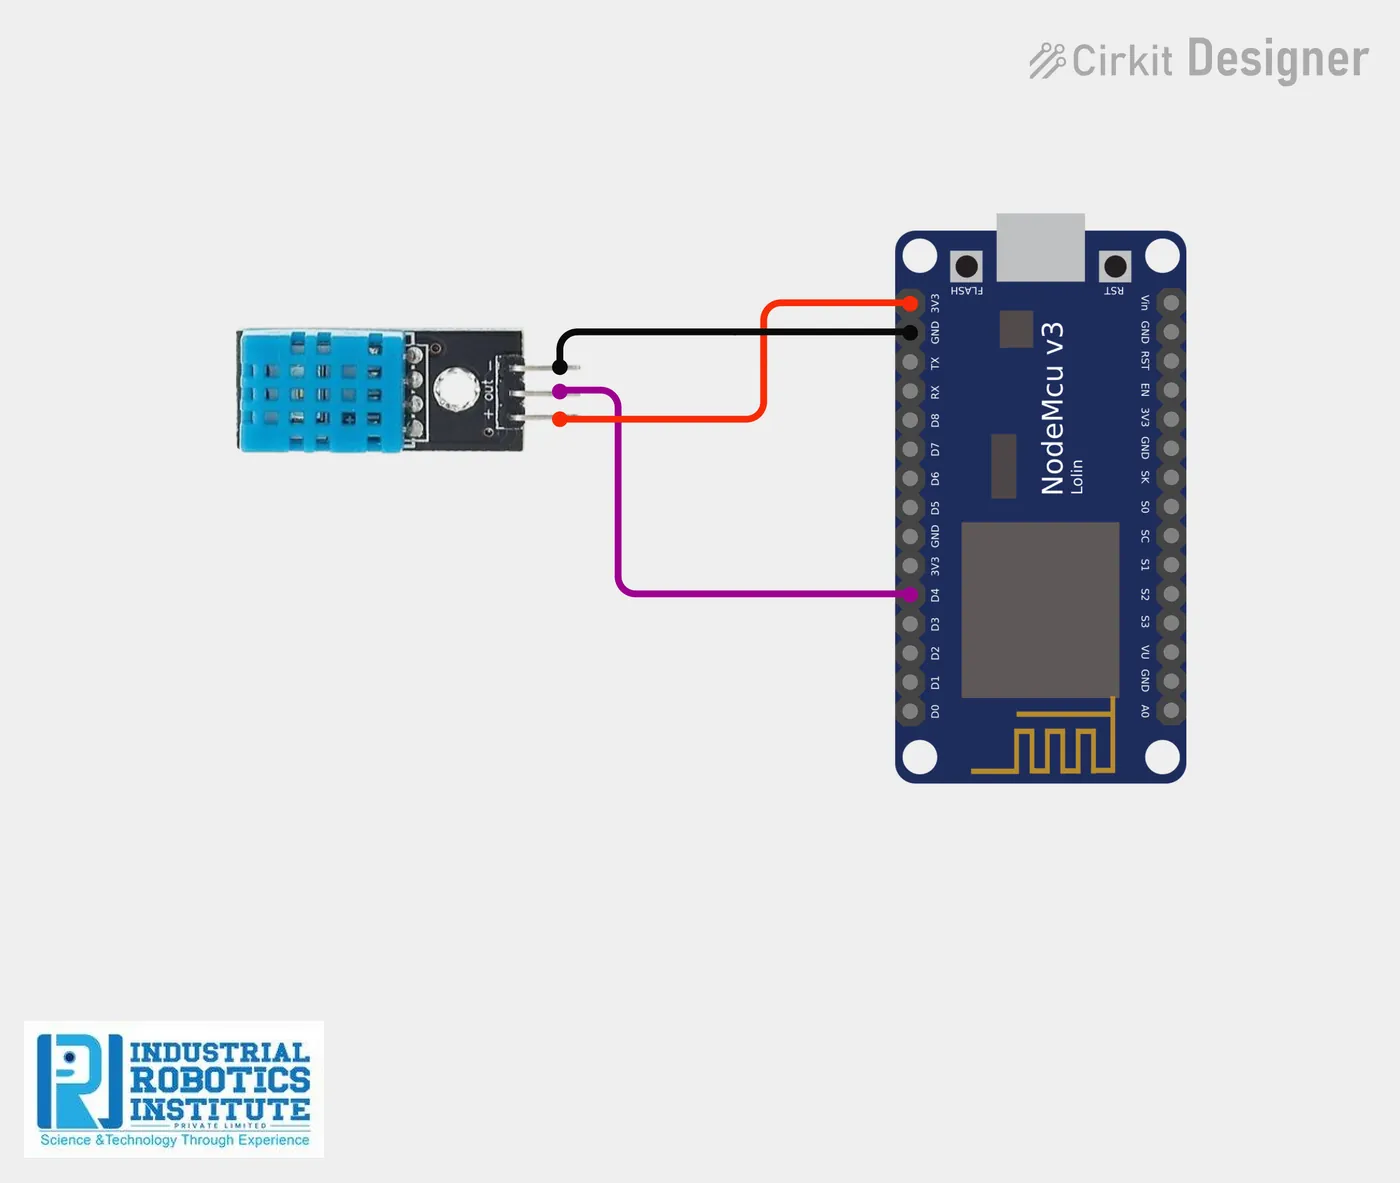
What is the IoT Temperature Monitoring (Cloud + Webpage)?
A temperature monitor with two ways to view it. A DHT11 sensor feeds an ESP8266, which hosts a small web page showing the live temperature (auto-refreshing every 5 seconds) and also uploads readings to a ThingSpeak cloud channel every 15 seconds for remote graphs.
How it works
- The DHT11 measures the temperature.
- The ESP8266 connects to Wi-Fi and prints its IP address.
- Opening that IP shows a page with the current temperature, refreshing every 5 seconds.
- Every 15 seconds the reading is sent to your ThingSpeak channel, which draws a graph.
Parts list
| Component | Qty |
|---|---|
| ESP8266 NodeMCU | 1 |
| DHT11 Temperature Sensor | 1 |
| Breadboard | 1 |
| Jumper Wires | As needed |
| USB Cable | 1 |
Software
- Arduino IDE
- ESP8266 board package
- DHT sensor library
- ThingSpeak library
- ThingSpeak account
Wiring and connections
| From | Connect to |
|---|---|
| DHT11 VCC | 3.3V |
| DHT11 GND | GND |
| DHT11 DATA | D4 (GPIO2) |
How to build the IoT Temperature Monitoring (Cloud + Webpage)
- Connect the DHT11 to 3.3V, GND and D4.
- Create a free ThingSpeak channel and copy its Channel ID and Write API Key.
- Install the DHT and ThingSpeak libraries.
- Fill in your Wi-Fi, Channel ID and API key in the code and upload it.
- Open the Serial Monitor at 9600 baud to find the IP address.
- Open the IP in a browser on the same Wi-Fi, and check the ThingSpeak graph.
IoT Temperature Monitoring (Cloud + Webpage) code
Complete, tested Arduino C++ code for this project. Copy it into Arduino IDE and upload it to the ESP8266 NodeMCU.
#include <ESP8266WiFi.h>
#include <ESP8266WebServer.h>
#include <DHT.h>
#include <ThingSpeak.h>
#define DHTPIN D4
#define DHTTYPE DHT11
DHT dht(DHTPIN, DHTTYPE);
const char* ssid = "YOUR_WIFI_NAME";
const char* password = "YOUR_WIFI_PASSWORD";
WiFiClient client;
ESP8266WebServer server(80);
unsigned long channelID = 0000000; // your ThingSpeak channel ID
const char* writeAPIKey = "YOUR_API_KEY";
float temperature;
unsigned long lastUpload = 0;
String webpage() {
String page = "<!DOCTYPE html><html>";
page += "<head><meta http-equiv='refresh' content='5'/>";
page += "<title>Temperature Monitor</title></head>";
page += "<body style='text-align:center; font-family:Arial;'>";
page += "<h1>IoT Temperature Monitoring</h1>";
page += "<h2>Temperature: " + String(temperature) + " °C</h2>";
page += "</body></html>";
return page;
}
void handleRoot() {
temperature = dht.readTemperature();
server.send(200, "text/html", webpage());
}
void setup() {
Serial.begin(9600);
dht.begin();
WiFi.begin(ssid, password);
while (WiFi.status() != WL_CONNECTED) {
delay(1000);
Serial.println("Connecting...");
}
Serial.print("IP Address: ");
Serial.println(WiFi.localIP());
ThingSpeak.begin(client);
server.on("/", handleRoot);
server.begin();
}
void loop() {
server.handleClient();
// Upload to ThingSpeak every 15 s without blocking the web page
if (millis() - lastUpload > 15000) {
lastUpload = millis();
temperature = dht.readTemperature();
if (!isnan(temperature)) {
ThingSpeak.writeField(channelID, 1, temperature, writeAPIKey);
Serial.println("Temperature Sent: " + String(temperature));
}
}
}Real-world uses
- Server rooms and labs
- Greenhouses
- Cold storage checks
- Learning cloud IoT
Frequently asked questions
What is a IoT Temperature Monitoring (Cloud + Webpage)?
A temperature monitor with two ways to view it. A DHT11 sensor feeds an ESP8266, which hosts a small web page showing the live temperature (auto-refreshing every 5 seconds) and also uploads readings to a ThingSpeak cloud channel every 15 seconds for remote graphs.
What components are needed for the IoT Temperature Monitoring (Cloud + Webpage)?
You need: ESP8266 NodeMCU (1), DHT11 Temperature Sensor (1), Breadboard (1), Jumper Wires, USB Cable (1). Software: Arduino IDE, ESP8266 board package, DHT sensor library, ThingSpeak library, ThingSpeak account.
Is the IoT Temperature Monitoring (Cloud + Webpage) project good for beginners?
It is rated intermediate and takes about 2–3 hours to build, using the ESP8266 NodeMCU. The guide on this page explains every connection and step.
Where can I get the code for the IoT Temperature Monitoring (Cloud + Webpage)?
The complete, tested Arduino C++ code is free on this page. Copy it into Arduino IDE and upload it to the board.
Can I buy a kit for the IoT Temperature Monitoring (Cloud + Webpage)?
Yes. IRI sells a kit with the parts for this project (PRJ-142). Message IRI on WhatsApp at +91 86060 82634 for the kit price and delivery details.