
Automatic Sprayer for Agriculture (Web-Controlled) Using ESP8266
Sprays crops on a timer you set from your phone.
Built and tested by Aboobacker sidheeq K P · Industrial Robotics Institute
What is the Automatic Sprayer for Agriculture (Web-Controlled)?
An automatic sprayer that sprays water, fertiliser or pesticide at regular intervals without anyone pressing the trigger. A servo presses the sprayer bottle’s nozzle, and the ESP8266 hosts a web page where you set how many seconds to wait between sprays.
How it works
- The ESP8266 connects to Wi-Fi and hosts a control page.
- You enter the spray interval in seconds and press Update.
- Every interval, the servo turns to 90° to press the sprayer for 1 second.
- The servo returns to 0° and waits for the next interval (10 seconds by default).
Parts list
| Component | Qty |
|---|---|
| ESP8266 NodeMCU | 1 |
| Servo Motor (SG90) | 1 |
| Sprayer bottle with nozzle | 1 |
| DC-DC Buck Converter | 1 |
| Lithium-ion Batteries | 2 |
| Battery Case with Switch | 1 |
| Jumper Wires | As needed |
Software
- Arduino IDE
- ESP8266WiFi library
- Servo library
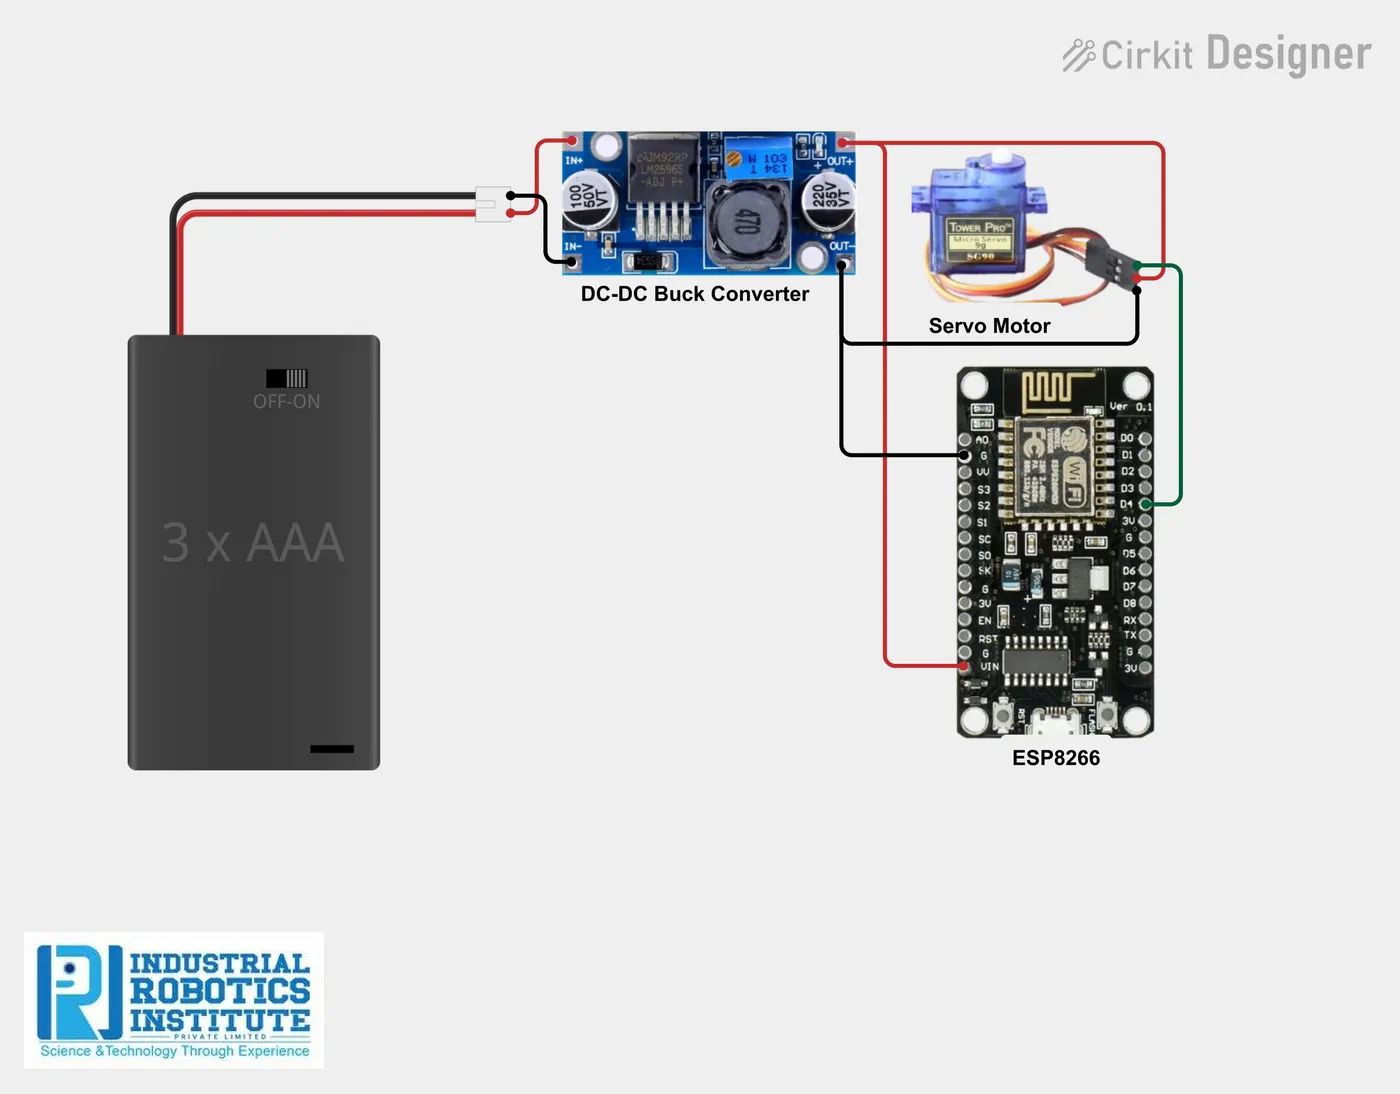
Wiring and connections
| From | Connect to |
|---|---|
| Servo red | 5V (buck output) |
| Servo brown | GND |
| Servo orange (signal) | D4 (GPIO2) |
| Battery + | Buck IN+ |
| Battery − | Buck IN− |
| Buck OUT+ (5V) | ESP8266 VIN & servo |
| Buck OUT− | GND |
How to build the Automatic Sprayer for Agriculture (Web-Controlled)
- Set the buck converter output to 5V.
- Power the ESP8266 and servo from the buck output; connect the servo signal to D4.
- Fix the servo so its arm presses the sprayer trigger when it turns to 90°.
- Put your Wi-Fi details in the code and upload it.
- Open the Serial Monitor at 115200 baud and note the IP address.
- Open the IP in a browser, enter the interval in seconds and press Update.
Automatic Sprayer for Agriculture (Web-Controlled) code
Complete, tested Arduino C++ code for this project. Copy it into Arduino IDE and upload it to the ESP8266 NodeMCU.
#include <ESP8266WiFi.h>
#include <Servo.h>

const char* ssid = "YOUR_SSID";
const char* password = "YOUR_PASSWORD";

WiFiServer server(80);
Servo sprayServo;
int servoPin = D4;

unsigned long interval = 10000;   // default 10 seconds
unsigned long previousMillis = 0;

void setup()
{
  Serial.begin(115200);
  delay(1000);
  Serial.println("Starting ESP8266...");

  sprayServo.attach(servoPin);
  sprayServo.write(0);

  WiFi.begin(ssid, password);
  while (WiFi.status() != WL_CONNECTED)
  {
    delay(500);
    Serial.print(".");
  }
  Serial.println();
  Serial.print("Device IP Address: ");
  Serial.println(WiFi.localIP());

  server.begin();
}

void loop()
{
  unsigned long currentMillis = millis();

  // ===== SPRAY LOGIC =====
  if (currentMillis - previousMillis >= interval)
  {
    previousMillis = currentMillis;
    sprayServo.write(90);   // Spray
    delay(1000);
    sprayServo.write(0);    // Reset
  }

  // ===== WEB CONTROL =====
  WiFiClient client = server.available();
  if (client)
  {
    String request = client.readStringUntil('\r');

    if (request.indexOf("/set?time=") != -1)
    {
      int start = request.indexOf("=") + 1;
      int end = request.indexOf(" ", start);
      interval = request.substring(start, end).toInt() * 1000;
      Serial.print("New Interval: ");
      Serial.print(interval / 1000);
      Serial.println(" seconds");
    }

    String html = "<html><body>";
    html += "<h1>Automatic Sprayer</h1>";
    html += "<form action='/set'>";
    html += "Set Time (seconds): <input type='number' name='time'>";
    html += "<input type='submit' value='Update'>";
    html += "</form>";
    html += "<p>Current Interval: ";
    html += interval / 1000;
    html += " sec</p>";
    html += "</body></html>";

    client.print("HTTP/1.1 200 OK\r\nContent-Type: text/html\r\n\r\n");
    client.print(html);
    delay(1);
    client.stop();
  }
}
Real-world uses
- Farms and nurseries
- Greenhouses
- Kitchen gardens
- Smart agriculture demos
Frequently asked questions
What is a Automatic Sprayer for Agriculture (Web-Controlled)?
An automatic sprayer that sprays water, fertiliser or pesticide at regular intervals without anyone pressing the trigger. A servo presses the sprayer bottle’s nozzle, and the ESP8266 hosts a web page where you set how many seconds to wait between sprays.
What components are needed for the Automatic Sprayer for Agriculture (Web-Controlled)?
You need: ESP8266 NodeMCU (1), Servo Motor (SG90) (1), Sprayer bottle with nozzle (1), DC-DC Buck Converter (1), Lithium-ion Batteries (2), Battery Case with Switch (1), Jumper Wires. Software: Arduino IDE, ESP8266WiFi library, Servo library.
Is the Automatic Sprayer for Agriculture (Web-Controlled) project good for beginners?
It is rated intermediate and takes about 2–3 hours to build, using the ESP8266 NodeMCU. The guide on this page explains every connection and step.
Where can I get the code for the Automatic Sprayer for Agriculture (Web-Controlled)?
The complete, tested Arduino C++ code is free on this page. Copy it into Arduino IDE and upload it to the board.
Can I buy a kit for the Automatic Sprayer for Agriculture (Web-Controlled)?
Yes. IRI sells a kit with the parts for this project (PRJ-042). Message IRI on WhatsApp at +91 86060 82634 for the kit price and delivery details.