
Remote Patient Monitoring System Using ESP32
Sends heart rate and body temperature to a doctor’s phone in real time.
Built and tested by Drisya K S · Industrial Robotics Institute
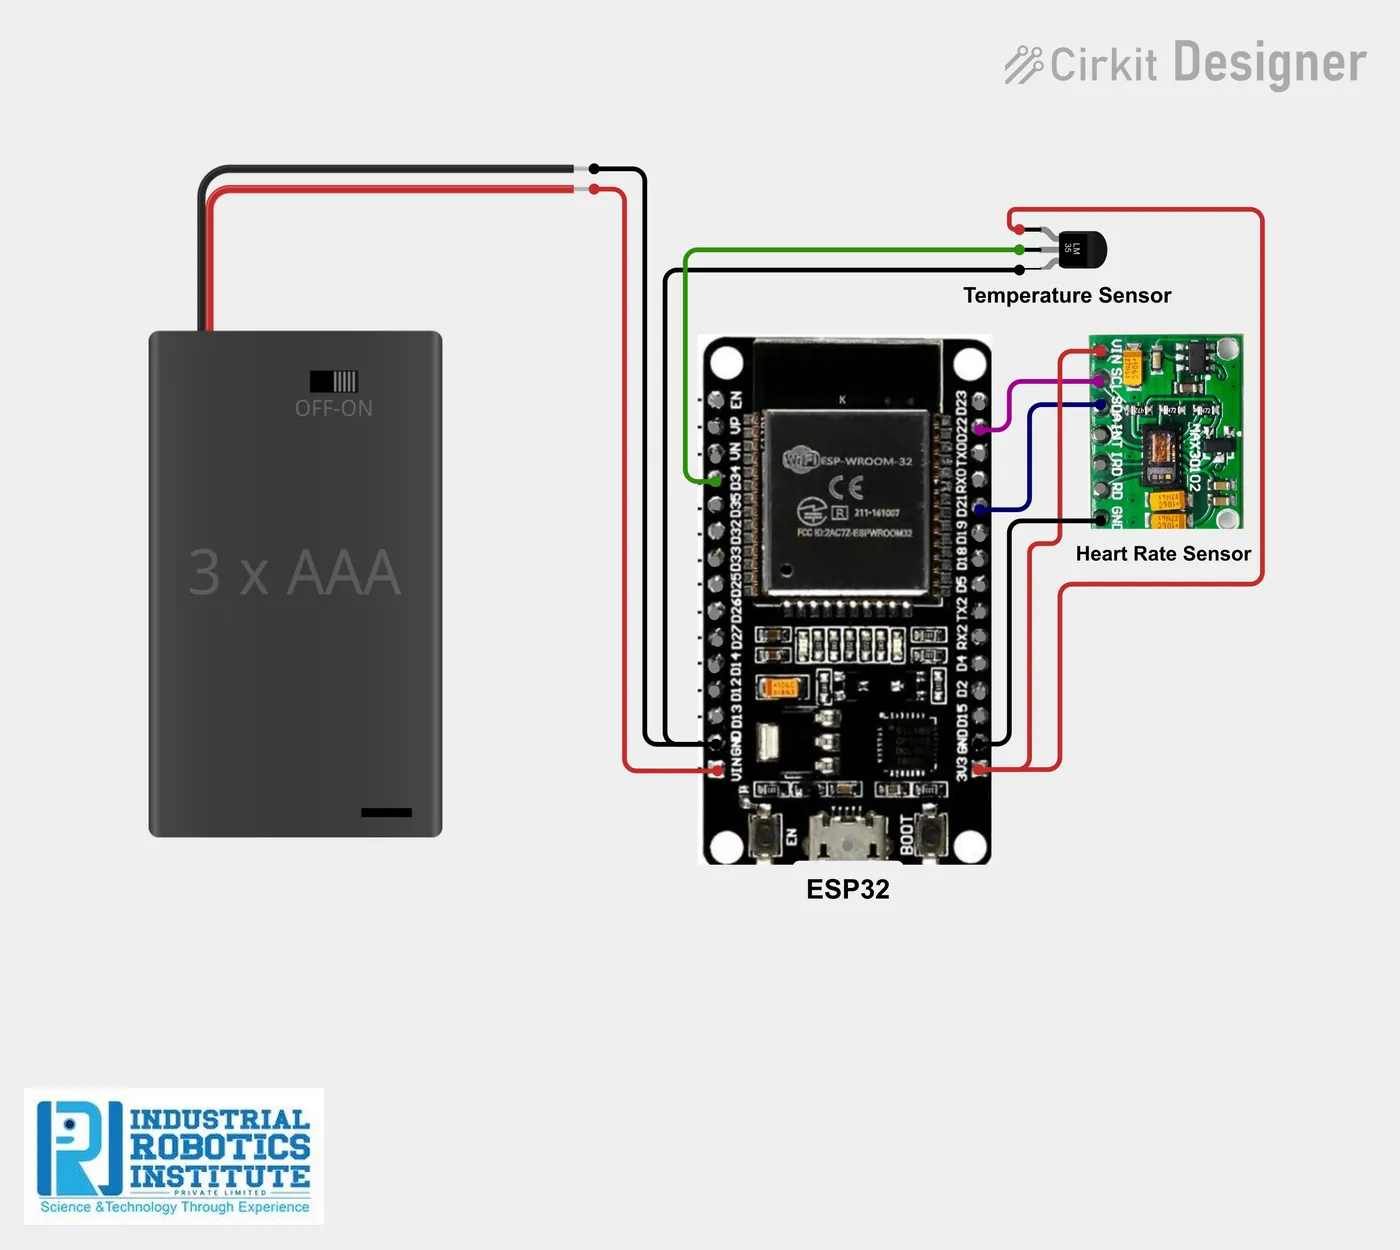
What is the Remote Patient Monitoring System?
A remote health monitor that lets doctors watch a patient’s vital signs without being at the bedside. A heart rate sensor and an LM35 temperature sensor feed the ESP32, which sends the readings every second to the Blynk cloud dashboard where they can be viewed on a phone.
How it works
- The heart rate and temperature sensors measure the patient’s vitals.
- The ESP32 reads both sensors every second.
- The temperature is converted to °C (LM35: 10 mV per degree).
- Both values are sent to Blynk virtual pins V1 and V2.
- Doctors or family view the live values in the Blynk app.
Parts list
| Component | Qty |
|---|---|
| ESP32 Dev Board | 1 |
| Heart Rate Sensor (pulse sensor or MAX30100/30102) | 1 |
| Temperature Sensor (LM35) | 1 |
| Pulse Oximeter (optional) | 1 |
| Jumper Wires / Breadboard | As needed |
| 5V Power Supply or Battery | 1 |
Software
- Arduino IDE
- Blynk IoT app
Wiring and connections
| From | Connect to |
|---|---|
| Heart sensor VCC | 3.3V |
| Heart sensor GND | GND |
| Heart sensor signal | GPIO 34 |
| LM35 VCC | 5V |
| LM35 GND | GND |
| LM35 OUT | GPIO 35 |
| (MAX30100 option) SDA / SCL | GPIO 21 / 22 |
How to build the Remote Patient Monitoring System
- Connect the heart rate sensor signal to GPIO 34 and the LM35 output to GPIO 35.
- In Blynk, create a template with datastreams V1 (heart rate) and V2 (temperature) and add gauges.
- Put your Blynk details and Wi-Fi name and password in the code.
- Upload the code from the Arduino IDE.
- Place a finger on the heart sensor and hold the LM35 to see the values change.
Remote Patient Monitoring System code
Complete, tested Arduino C++ code for this project. Copy it into Arduino IDE and upload it to the ESP32.
#define BLYNK_TEMPLATE_ID "YourTemplateID"
#define BLYNK_TEMPLATE_NAME "Patient Monitor"
#define BLYNK_AUTH_TOKEN "YourAuthToken"
#define BLYNK_PRINT Serial

#include <WiFi.h>
#include <BlynkSimpleEsp32.h>

char ssid[] = "YourWiFiName";
char pass[] = "YourWiFiPassword";

#define heartPin 34
#define tempPin  35

int heartRate = 0;
float temperature = 0;

void setup() {
  Serial.begin(115200);
  Blynk.begin(BLYNK_AUTH_TOKEN, ssid, pass);
}

void loop() {
  heartRate = analogRead(heartPin);   // raw signal; use the MAX30100 library for true BPM
  int tempValue = analogRead(tempPin);
  temperature = (tempValue * 3.3 / 4095.0) * 100;   // LM35 conversion

  Blynk.virtualWrite(V1, heartRate);
  Blynk.virtualWrite(V2, temperature);

  Blynk.run();
  delay(1000);
}
Real-world uses
- Home care for elderly patients
- Post-surgery monitoring
- Rural health centres
- Learning health IoT
Frequently asked questions
What is a Remote Patient Monitoring System?
A remote health monitor that lets doctors watch a patient’s vital signs without being at the bedside. A heart rate sensor and an LM35 temperature sensor feed the ESP32, which sends the readings every second to the Blynk cloud dashboard where they can be viewed on a phone.
What components are needed for the Remote Patient Monitoring System?
You need: ESP32 Dev Board (1), Heart Rate Sensor (pulse sensor or MAX30100/30102) (1), Temperature Sensor (LM35) (1), Pulse Oximeter (optional) (1), Jumper Wires / Breadboard, 5V Power Supply or Battery (1). Software: Arduino IDE, Blynk IoT app.
Is the Remote Patient Monitoring System project good for beginners?
It is rated intermediate and takes about 2–3 hours to build, using the ESP32. The guide on this page explains every connection and step.
Where can I get the code for the Remote Patient Monitoring System?
The complete, tested Arduino C++ code is free on this page. Copy it into Arduino IDE and upload it to the board.
Can I buy a kit for the Remote Patient Monitoring System?
Yes. IRI sells a kit with the parts for this project (PRJ-055). Message IRI on WhatsApp at +91 86060 82634 for the kit price and delivery details.