
Disaster Monitoring and Alarm System (ESP8266)
Watches for gas, heat and flooding, sounds an alarm and shows it all online.
Built and tested by Aboobacker sidheeq K P · Industrial Robotics Institute
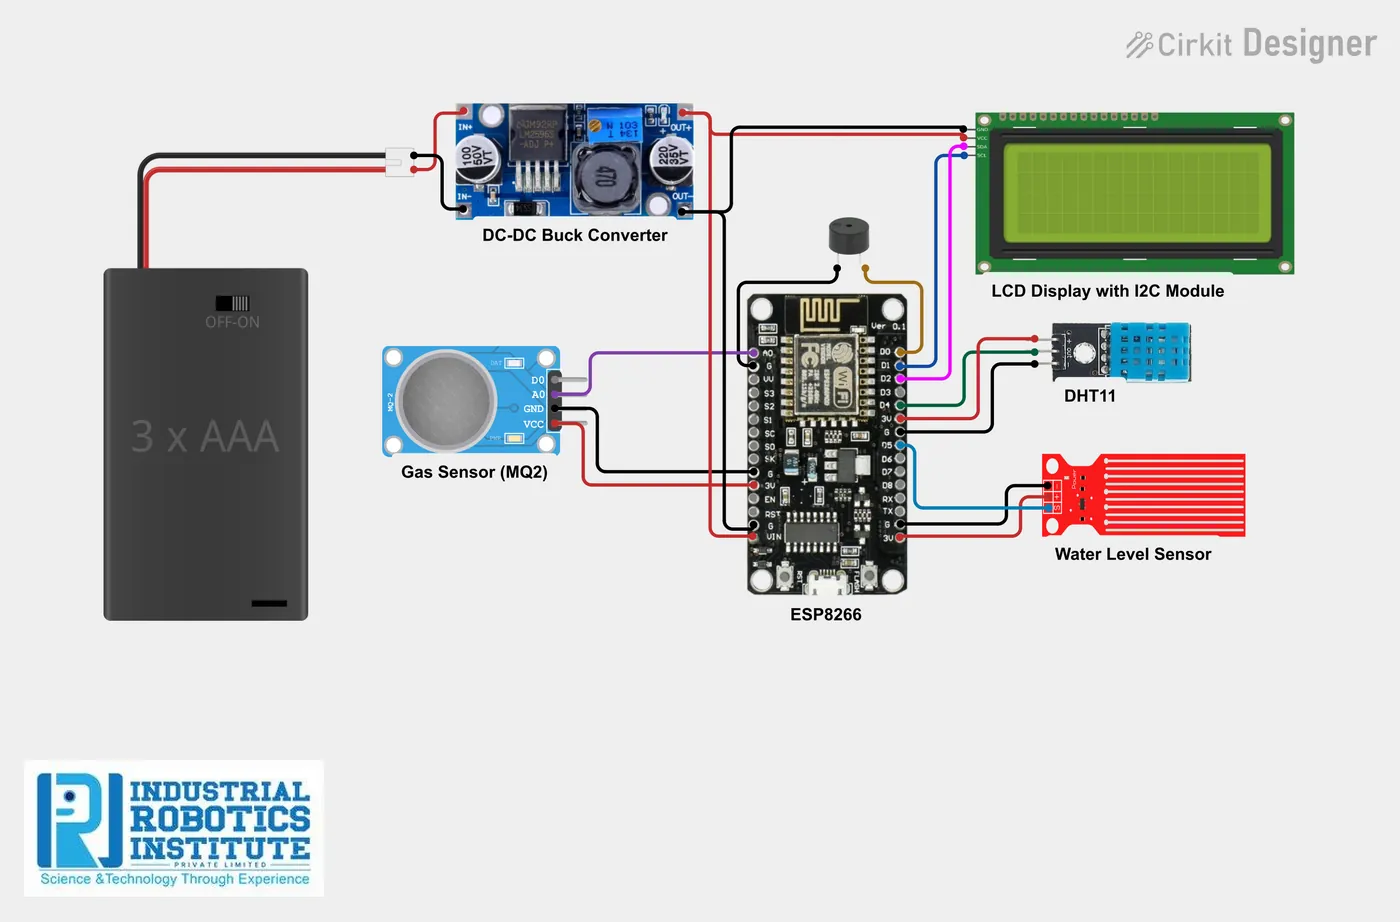
What is the Disaster Monitoring and Alarm System (ESP8266)?
An IoT early-warning system for fire, flood and gas hazards. The ESP8266 reads a gas sensor, a temperature sensor and a water level sensor, decides an alert level (SAFE, MEDIUM or HIGH), sounds a buzzer on danger, shows the status on an LCD and serves a web page with the live readings and a chart.
How it works
- The MQ2, DHT11 and water level sensors are read every second.
- Gas above 600, temperature above 45 °C or water present means HIGH: the buzzer sounds.
- Gas above 400 or temperature above 35 °C means MEDIUM; otherwise SAFE.
- The LCD shows the temperature and alert level.
- Opening the device’s IP in a browser shows all readings, the level and a chart.
Parts list
| Component | Qty |
|---|---|
| ESP8266 NodeMCU | 1 |
| Gas Sensor (MQ2) | 1 |
| Temperature Sensor (DHT11) | 1 |
| Water Level Sensor | 1 |
| Buzzer | 1 |
| 16×2 LCD with I2C Module | 1 |
| DC-DC Buck Converter | 1 |
| Lithium-ion Batteries | 2 |
| Battery Case with Switch | 1 |
| Jumper Wires | As needed |
Software
- Arduino IDE
- DHT sensor library
- LiquidCrystal_I2C library
- ESP8266WiFi library
Wiring and connections
| From | Connect to |
|---|---|
| MQ2 VCC | 5V |
| MQ2 GND | GND |
| MQ2 AOUT | A0 |
| DHT11 VCC | 3.3V |
| DHT11 GND | GND |
| DHT11 DATA | D4 |
| Water sensor VCC | 3.3V |
| Water sensor GND | GND |
| Water sensor OUT | D5 |
| Buzzer + | D0 |
| LCD VCC | 5V (buck output) |
| LCD SDA | D2 |
| LCD SCL | D1 |
| Battery | Buck IN, set to 5V |
| Buck 5V OUT | ESP VIN & LCD |
How to build the Disaster Monitoring and Alarm System (ESP8266)
- Set the buck converter output to 5V before connecting anything.
- Wire the MQ2 to A0, the DHT11 to D4 and the water sensor to D5.
- Connect the buzzer to D0 and the I2C LCD to D2 (SDA) and D1 (SCL).
- Install the DHT and LiquidCrystal_I2C libraries.
- Put your Wi-Fi name and password in the code and upload it.
- The LCD shows the IP address for 4 seconds; open it in a browser on the same Wi-Fi.
- Let the gas sensor warm up a few minutes, then test each sensor.
Disaster Monitoring and Alarm System (ESP8266) code
Complete, tested Arduino C++ code for this project. Copy it into Arduino IDE and upload it to the ESP8266 NodeMCU.
#include <ESP8266WiFi.h>
#include <DHT.h>
#include <Wire.h>
#include <LiquidCrystal_I2C.h>

#define DHTPIN D4
#define DHTTYPE DHT11

DHT dht(DHTPIN, DHTTYPE);
LiquidCrystal_I2C lcd(0x27, 16, 2);

const char* ssid = "YOUR_SSID";
const char* password = "YOUR_PASSWORD";

WiFiServer server(80);

int gasPin = A0;
int waterPin = D5;
int buzzer = D0;

String level = "SAFE";

void setup()
{
  pinMode(waterPin, INPUT);
  pinMode(buzzer, OUTPUT);

  lcd.init();          // some library versions use lcd.begin()
  lcd.backlight();
  dht.begin();

  lcd.setCursor(0, 0);
  lcd.print("Connecting WiFi");
  WiFi.begin(ssid, password);
  while (WiFi.status() != WL_CONNECTED)
  {
    delay(500);
    lcd.print(".");
  }

  lcd.clear();
  lcd.setCursor(0, 0);
  lcd.print("IP Address:");
  lcd.setCursor(0, 1);
  lcd.print(WiFi.localIP());
  delay(4000);

  lcd.clear();
  lcd.print("System Ready");
  server.begin();
}

void loop()
{
  float temp = dht.readTemperature();
  int gas = analogRead(gasPin);
  int water = digitalRead(waterPin);

  // Determine alert level
  if (gas > 600 || temp > 45 || water == HIGH)
  {
    level = "HIGH";
    digitalWrite(buzzer, HIGH);
  }
  else if (gas > 400 || temp > 35)
  {
    level = "MEDIUM";
    digitalWrite(buzzer, LOW);
  }
  else
  {
    level = "SAFE";
    digitalWrite(buzzer, LOW);
  }

  // LCD display
  lcd.clear();
  lcd.setCursor(0, 0);
  lcd.print("T:");
  lcd.print(temp);
  lcd.setCursor(0, 1);
  lcd.print(level);

  // Web server
  WiFiClient client = server.available();
  if (client)
  {
    String html = "<html><body>";
    html += "<h1>Disaster Monitor</h1>";
    html += "<p>Temperature: " + String(temp) + "</p>";
    html += "<p>Gas: " + String(gas) + "</p>";
    html += "<p>Water: " + String(water) + "</p>";
    html += "<p>Level: " + level + "</p>";
    html += "<canvas id='chart'></canvas>";
    html += "<script src='https://cdn.jsdelivr.net/npm/chart.js'></script>";
    html += "<script>";
    html += "var ctx=document.getElementById('chart').getContext('2d');";
    html += "new Chart(ctx,{type:'bar',data:{labels:['Temp','Gas','Water'],datasets:[{label:'Readings',data:[";
    html += String(temp) + "," + String(gas) + "," + String(water);
    html += "]}]}});";
    html += "</script></body></html>";

    client.print("HTTP/1.1 200 OK\r\nContent-Type: text/html\r\n\r\n");
    client.print(html);
    delay(1);
    client.stop();
  }

  delay(1000);
}
Real-world uses
- Homes and hostels
- Warehouses and factories
- Flood-prone basements
- Disaster-awareness models
Frequently asked questions
What is a Disaster Monitoring and Alarm System (ESP8266)?
An IoT early-warning system for fire, flood and gas hazards. The ESP8266 reads a gas sensor, a temperature sensor and a water level sensor, decides an alert level (SAFE, MEDIUM or HIGH), sounds a buzzer on danger, shows the status on an LCD and serves a web page with the live readings and a chart.
What components are needed for the Disaster Monitoring and Alarm System (ESP8266)?
You need: ESP8266 NodeMCU (1), Gas Sensor (MQ2) (1), Temperature Sensor (DHT11) (1), Water Level Sensor (1), Buzzer (1), 16×2 LCD with I2C Module (1), DC-DC Buck Converter (1), Lithium-ion Batteries (2), Battery Case with Switch (1), Jumper Wires. Software: Arduino IDE, DHT sensor library, LiquidCrystal_I2C library, ESP8266WiFi library.
Is the Disaster Monitoring and Alarm System (ESP8266) project good for beginners?
It is rated intermediate and takes about 3–4 hours to build, using the ESP8266 NodeMCU. The guide on this page explains every connection and step.
Where can I get the code for the Disaster Monitoring and Alarm System (ESP8266)?
The complete, tested Arduino C++ code is free on this page. Copy it into Arduino IDE and upload it to the board.
Can I buy a kit for the Disaster Monitoring and Alarm System (ESP8266)?
Yes. IRI sells a kit with the parts for this project (PRJ-040). Message IRI on WhatsApp at +91 86060 82634 for the kit price and delivery details.