
RFID Attendance System with Google Sheets Using ESP8266
Tap a card to mark attendance straight into a Google Sheet.
Built and tested by Sreejith K V · Industrial Robotics Institute
What is the RFID Attendance System with Google Sheets?
Manual registers are slow and error-prone. In this project every student gets an RFID card. When the card is tapped on the RC522 reader, the ESP8266 reads its unique ID, connects to Wi-Fi and sends it to a Google Apps Script, which writes the name, card ID and time into a Google Sheet. An LED and buzzer confirm each scan.
How it works
- A card is placed near the RC522 reader, which reads its unique ID (UID).
- The UID is passed to the ESP8266 over SPI.
- The ESP8266 connects to Wi-Fi and sends the UID to your Google Apps Script web app.
- The script adds a new row with the name, UID and time to the Google Sheet.
- The LED and buzzer turn on for one second to confirm attendance was marked.
Parts list
| Component | Qty |
|---|---|
| ESP8266 NodeMCU | 1 |
| RFID Reader RC522 | 1 |
| RFID Cards / Tags | As needed |
| LED | 1 |
| Buzzer | 1 |
| Breadboard | 1 |
| Jumper Wires | As needed |
| USB Cable | 1 |
Software
- Arduino IDE
- Google Sheets
- Google Apps Script
- MFRC522 library
- ESP8266WiFi library
Wiring and connections
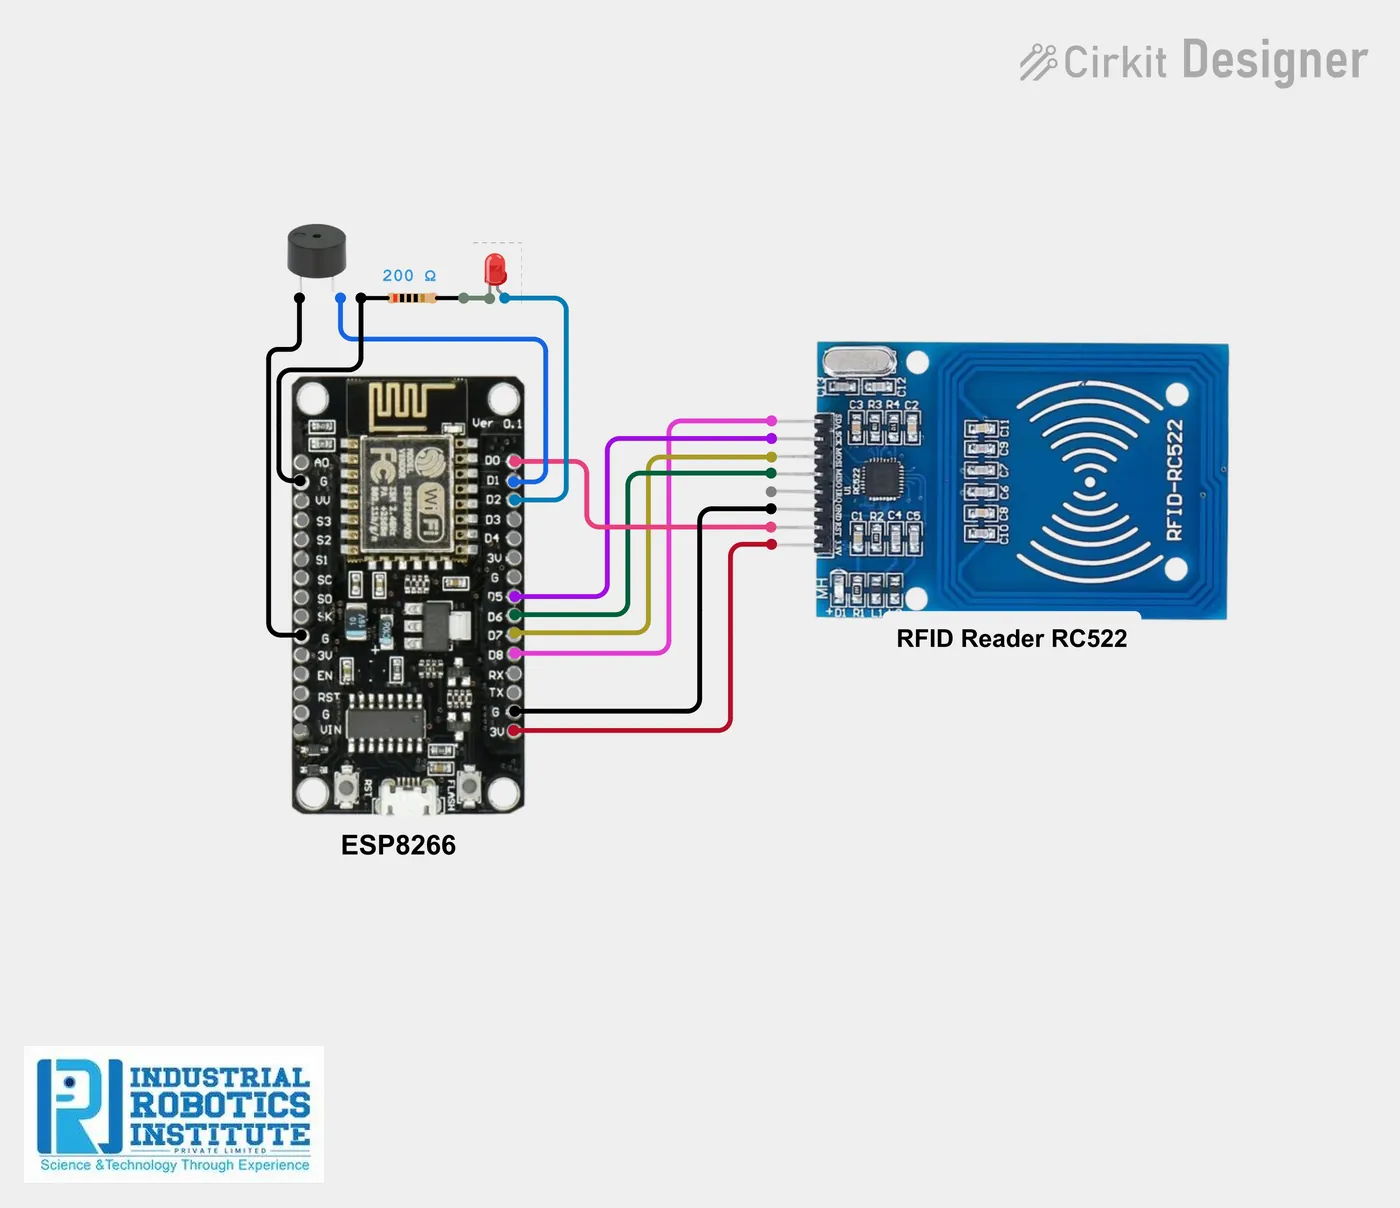
| From | Connect to |
|---|---|
| RC522 SDA | D8 |
| RC522 SCK | D5 |
| RC522 MOSI | D7 |
| RC522 MISO | D6 |
| RC522 RST | D0 |
| RC522 GND | GND |
| RC522 3.3V | 3.3V (not 5V) |
| LED + | D2 |
| Buzzer + | D1 |
How to build the RFID Attendance System with Google Sheets
- Wire the RC522 to the NodeMCU as in the table. Use 3.3V only; 5V can damage the reader.
- Connect the LED to D2 and the buzzer to D1.
- Create a Google Sheet with the columns Name, UID, Date and Time.
- Open Extensions → Apps Script, paste the doGet script from the guide, and save.
- Deploy it as a Web App (Execute as: Me, Who has access: Anyone) and copy the URL.
- Put your Wi-Fi details and the web app path into the ESP8266 code.
- Install the MFRC522 library and upload the code from the Arduino IDE.
- Tap a card and check that a new row appears in the sheet.
RFID Attendance System with Google Sheets code
Complete, tested Arduino C++ code for this project. Copy it into Arduino IDE and upload it to the ESP8266 NodeMCU.
#include <ESP8266WiFi.h>
#include <SPI.h>
#include <MFRC522.h>

#define SS_PIN D8
#define RST_PIN D0

MFRC522 mfrc522(SS_PIN, RST_PIN);

const char* ssid = "YOUR_WIFI";
const char* password = "YOUR_PASS";

const char* host = "script.google.com";
String url = "/macros/s/XXXX/exec";

void setup()
{
  Serial.begin(9600);

  WiFi.begin(ssid, password);
  while (WiFi.status() != WL_CONNECTED)
  {
    delay(500);
  }

  SPI.begin();
  mfrc522.PCD_Init();

  pinMode(D2, OUTPUT);  // LED
  pinMode(D1, OUTPUT);  // Buzzer
}

void loop()
{
  if (!mfrc522.PICC_IsNewCardPresent()) return;
  if (!mfrc522.PICC_ReadCardSerial()) return;

  String uid = "";
  for (byte i = 0; i < mfrc522.uid.size; i++)
  {
    uid += String(mfrc522.uid.uidByte[i], HEX);
  }

  WiFiClient client;
  if (!client.connect(host, 80)) return;

  String link = url + "?name=Student&uid=" + uid;
  client.print(String("GET ") + link + " HTTP/1.1\r\n" +
               "Host: " + host + "\r\n" +
               "Connection: close\r\n\r\n");

  digitalWrite(D2, HIGH);
  digitalWrite(D1, HIGH);
  delay(1000);
  digitalWrite(D2, LOW);
  digitalWrite(D1, LOW);
}

/* Google Apps Script (Extensions → Apps Script)
function doGet(e) {
  var sheet = SpreadsheetApp.getActiveSpreadsheet().getSheetByName("Sheet1");
  var name = e.parameter.name;
  var uid = e.parameter.uid;
  var time = new Date();
  sheet.appendRow([name, uid, time]);
  return ContentService.createTextOutput("OK");
}
*/
Real-world uses
- Schools and colleges
- Offices
- Coaching centres
- Events and workshops
Frequently asked questions
What is a RFID Attendance System with Google Sheets?
Manual registers are slow and error-prone. In this project every student gets an RFID card.
What components are needed for the RFID Attendance System with Google Sheets?
You need: ESP8266 NodeMCU (1), RFID Reader RC522 (1), RFID Cards / Tags, LED (1), Buzzer (1), Breadboard (1), Jumper Wires, USB Cable (1). Software: Arduino IDE, Google Sheets, Google Apps Script, MFRC522 library, ESP8266WiFi library.
Is the RFID Attendance System with Google Sheets project good for beginners?
It is rated intermediate and takes about 3–4 hours to build, using the ESP8266 NodeMCU. The guide on this page explains every connection and step.
Where can I get the code for the RFID Attendance System with Google Sheets?
The complete, tested Arduino C++ code is free on this page. Copy it into Arduino IDE and upload it to the board.
Can I buy a kit for the RFID Attendance System with Google Sheets?
Yes. IRI sells a kit with the parts for this project (PRJ-013). Message IRI on WhatsApp at +91 86060 82634 for the kit price and delivery details.