
IoT Fan Speed Control (ESP8266)
Set your fan’s speed from 0 to 100% with a slider on your phone.
Built and tested by Aboobacker sidheeq K P · Industrial Robotics Institute
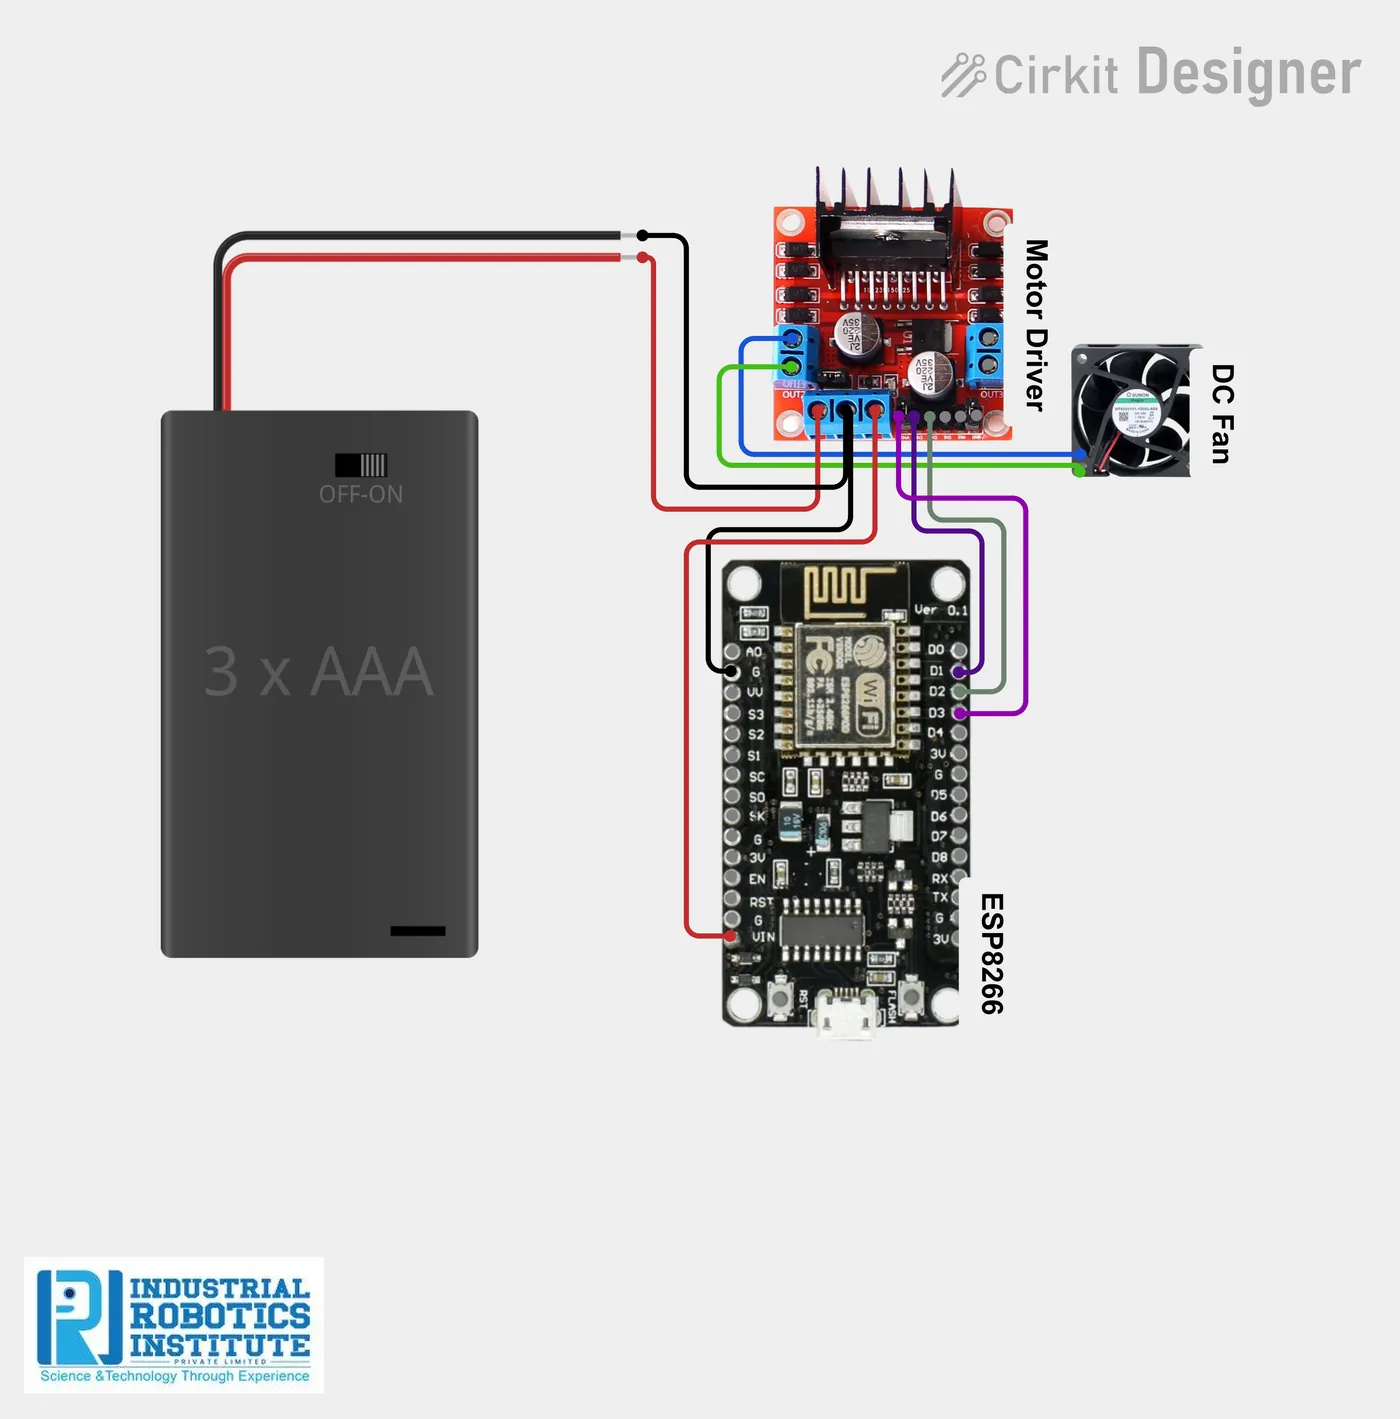
What is the IoT Fan Speed Control (ESP8266)?
A Wi-Fi fan speed controller. The ESP8266 joins your Wi-Fi and hosts a web page with a slider. Moving the slider sends the new speed to the ESP8266, which turns it into a PWM signal for the L298N motor driver, smoothly changing the DC fan’s speed from off to full.
How it works
- The ESP8266 connects to Wi-Fi and prints its IP address.
- Opening that IP shows a page with a 0–100% slider.
- Moving the slider sends /set?speed=NN to the ESP8266.
- The ESP8266 maps 0–100% to a PWM value of 0–1023 on the ENA pin.
- The L298N drives the fan motor at that speed.
Parts list
| Component | Qty |
|---|---|
| ESP8266 NodeMCU | 1 |
| DC Motor (fan) | 1 |
| L298N Motor Driver Module | 1 |
| Lithium-ion Batteries | 2 |
| Battery Case with Switch | 1 |
| Jumper Wires | As needed |
Software
- Arduino IDE
- ESP8266WiFi library
Wiring and connections
| From | Connect to |
|---|---|
| L298N IN1 | D1 |
| L298N IN2 | D2 |
| L298N ENA (PWM) | D3 |
| Fan motor | L298N OUT1 & OUT2 |
| Battery + | L298N VCC |
| Battery − | GND |
| ESP8266 VIN | L298N 5V |
| ESP8266 GND | L298N GND (common ground) |
How to build the IoT Fan Speed Control (ESP8266)
- Remove the ENA jumper on the L298N so the ESP8266 can control speed.
- Connect IN1 to D1, IN2 to D2 and ENA to D3.
- Connect the fan motor to the L298N output and the batteries to its power input.
- Make sure the ESP8266 and L298N share a common ground.
- Put your Wi-Fi details in the code and upload it.
- Open the Serial Monitor at 115200 baud to find the IP address.
- Open that IP on your phone and move the slider.
IoT Fan Speed Control (ESP8266) code
Complete, tested Arduino C++ code for this project. Copy it into Arduino IDE and upload it to the ESP8266 NodeMCU.
#include <ESP8266WiFi.h>

const char* ssid = "YOUR_SSID";
const char* password = "YOUR_PASSWORD";

WiFiServer server(80);

int IN1 = D1;
int IN2 = D2;
int ENA = D3;

int speedValue = 0;

void setup()
{
  Serial.begin(115200);
  delay(1000);
  Serial.println("ESP8266 Starting...");

  pinMode(IN1, OUTPUT);
  pinMode(IN2, OUTPUT);
  pinMode(ENA, OUTPUT);

  digitalWrite(IN1, HIGH);   // fixed direction
  digitalWrite(IN2, LOW);

  WiFi.begin(ssid, password);
  while (WiFi.status() != WL_CONNECTED)
  {
    delay(500);
    Serial.print(".");
  }
  Serial.println();
  Serial.print("Device IP Address: ");
  Serial.println(WiFi.localIP());

  server.begin();
}

void loop()
{
  WiFiClient client = server.available();
  if (!client) return;

  String request = client.readStringUntil('\r');
  client.flush();

  if (request.indexOf("/set?speed=") != -1)
  {
    int start = request.indexOf("=") + 1;
    int end = request.indexOf(" ", start);
    speedValue = request.substring(start, end).toInt();

    int pwm = map(speedValue, 0, 100, 0, 1023);
    analogWrite(ENA, pwm);

    Serial.print("Speed Set To: ");
    Serial.print(speedValue);
    Serial.println("%");
  }

  String html = "<!DOCTYPE html><html><head>";
  html += "<meta name='viewport' content='width=device-width, initial-scale=1'>";
  html += "<title>Fan Speed Control</title></head><body>";
  html += "<h1>Fan Speed Control</h1>";
  html += "<input type='range' min='0' max='100' value='" + String(speedValue) + "' ";
  html += "onchange=\"location.href='/set?speed='+this.value\">";
  html += "<p>Speed: " + String(speedValue) + "%</p>";
  html += "</body></html>";

  client.print("HTTP/1.1 200 OK\r\n");
  client.print("Content-Type: text/html\r\n\r\n");
  client.print(html);
  delay(1);
  client.stop();
}
Real-world uses
- Smart home fans
- Remote ventilation control
- Learning PWM speed control
- Energy saving demos
Frequently asked questions
What is a IoT Fan Speed Control (ESP8266)?
A Wi-Fi fan speed controller. The ESP8266 joins your Wi-Fi and hosts a web page with a slider.
What components are needed for the IoT Fan Speed Control (ESP8266)?
You need: ESP8266 NodeMCU (1), DC Motor (fan) (1), L298N Motor Driver Module (1), Lithium-ion Batteries (2), Battery Case with Switch (1), Jumper Wires. Software: Arduino IDE, ESP8266WiFi library.
Is the IoT Fan Speed Control (ESP8266) project good for beginners?
It is rated intermediate and takes about 2–3 hours to build, using the ESP8266 NodeMCU. The guide on this page explains every connection and step.
Where can I get the code for the IoT Fan Speed Control (ESP8266)?
The complete, tested Arduino C++ code is free on this page. Copy it into Arduino IDE and upload it to the board.
Can I buy a kit for the IoT Fan Speed Control (ESP8266)?
Yes. IRI sells a kit with the parts for this project (PRJ-041). Message IRI on WhatsApp at +91 86060 82634 for the kit price and delivery details.